
The image below demonstrates several problems that can occur during home development. Dust, fibers, and processing errors are all common hazards.

This test shot shows what happens when chemistry goes wrong. There’s also a fiber visible near the center—a reminder that medium format’s larger negatives attract and display more debris. The rest of the roll processed normally. Digital medium format eliminates these variables entirely, but working through them is part of what makes film engaging. The above image was taken with theHasselblad 500cm. Check out my article on developing color film to see how I developed this image.
Double Exposures and Handling Errors
The image below was shot with the Hasselblad 500cm. The Hasselblad system’s modularity is one of its greatest strengths, but it also introduces handling considerations that can catch you off guard.

This double exposure occurred because I removed the film back to inspect it, then advanced the body without the back attached. The Hasselblad’s interlock system prevents the shutter from firing when the dark slide is inserted, but the film advance mechanism operates independently. Remove the back, cock the shutter, replace the back, and you’ve got an unintended double exposure.
Of course, this same “quirk” becomes a feature when double exposures are your goal.
Temperature-Related Problems
Reticulation
What it looks like: The film emulsion appears cracked, crinkled, or has a network pattern resembling dried mud. The texture overlays the entire image and appears as increased grain or texture in prints. The below images are recreations of how these issues tend to look. When I experience each, I’ll slowly be able to replace with my actual failed images.
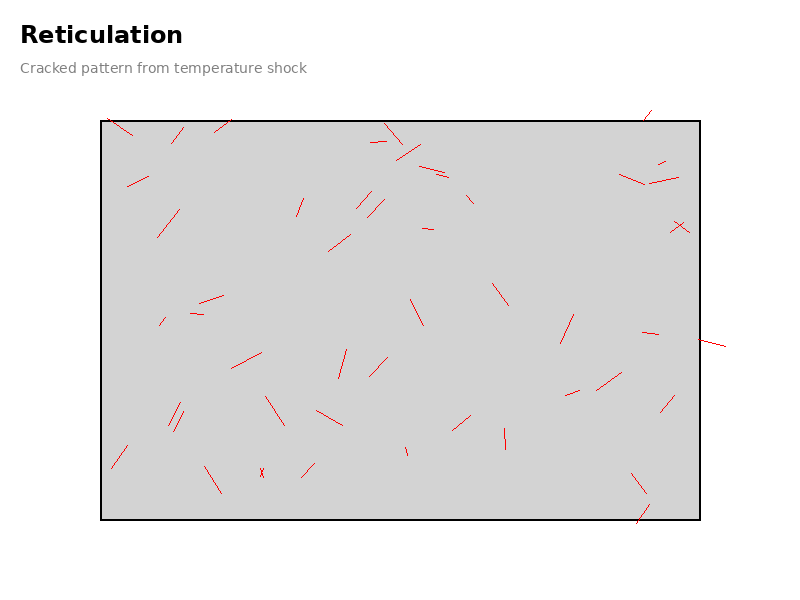
Cause: Reticulation occurs when the gelatin emulsion experiences extreme temperature variations during processing. Modern films are relatively resistant to reticulation, but it remains a risk when temperature control is poor. The most common scenario is pouring hot developer (freshly mixed powder developer, for example) directly into the tank, or moving from very hot developer to ice-cold stop bath or fixer.
How to prevent it:
- Maintain all chemistry at consistent temperatures, typically 20°C (68°F) for B&W, and higher for color.
- Allow freshly mixed powder developers to cool to working temperature before use
- Avoid temperature differences greater than 5°C between processing steps
- Use a water bath to stabilize chemical temperatures before processing
- Prewashing film helps to get film to desired temp before coming into contact with developing chemicals.
Recovery: Reticulation permanently damages the film structure. While occasionally it produces interesting artistic effects, most reticulated negatives cannot be salvaged for professional work.
Increased Grain from Temperature Variations
What it looks like: Grain appears larger and more pronounced than expected for the film stock, even when reticulation isn’t visible.
Cause: Temperature variations that don’t reach reticulation levels still affect emulsion structure, causing silver grain clumping.
How to prevent it:
- Monitor developer temperature carefully, maintaining ±0.5°C accuracy
- Pre-warm or pre-cool your developing tank to working temperature
- Use a digital thermometer for accurate readings
Agitation Problems
Surge Marks
What it looks like: For 120 film, surge marks appear as dark streaks or bands parallel to the film edges. These are areas of higher density caused by developer surging across the film surface. Check out my article about streaks in film.
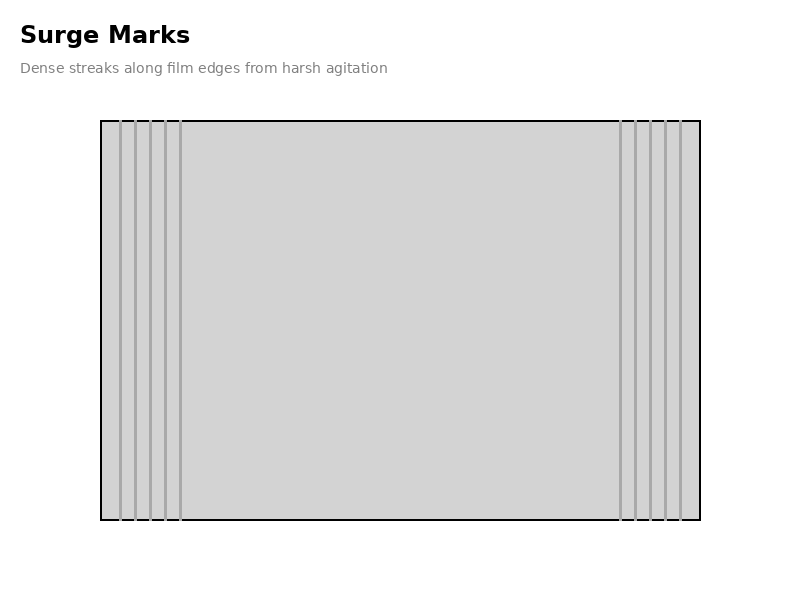
Cause: Overly vigorous or inconsistent agitation during development causes developer to flow rapidly across the film, creating areas of increased development. In 120 film loaded on plastic reels, aggressive agitation can create turbulence that unevenly distributes fresh developer.
How to prevent it:
- Use gentle, consistent inversions (rotate the tank as you turn it end-over-end)
- Follow manufacturer recommendations: typically 4-5 inversions in the first 30 seconds, then 2-3 inversions every 30-60 seconds
- Avoid harsh agitation methods like vigorous shaking
- Consider using the swirling stick method for very gentle agitation
- Tap the tank gently on the counter after initial developer pour to dislodge air bubbles
Bromide Drag (Insufficient Agitation)
What it looks like: Streaks or areas of lower density running down the film, often appearing as light streaks in the final image. Can look like uneven development with distinct patterns.
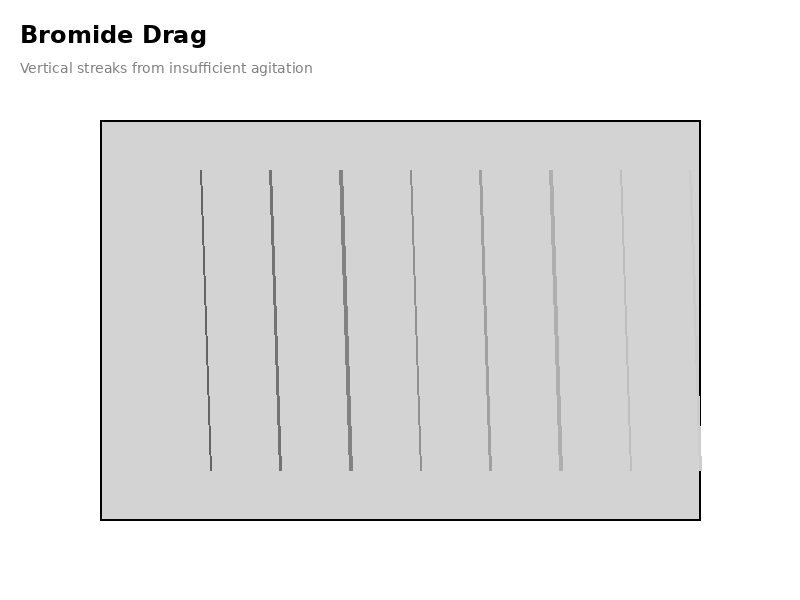
Cause: Insufficient agitation allows bromide ions (a byproduct of development) to accumulate at the film surface, inhibiting further development in those areas.
How to prevent it:
- Follow recommended agitation schedules consistently
- Don’t skip agitation cycles
- Ensure complete solution coverage during agitation
- Consider pre-soaking film in water for 1-2 minutes before development
Loading Problems Specific to 120 Film
Film Overlap
What it looks like: Large opaque blotches on the negative, often brown or bluish. Areas where film touched during development show no image detail.
Cause: 120 film was improperly loaded on the reel with adjacent wraps touching each other. This is more common with 120 than 35mm because of the wider film format and the need to separate the backing paper.
How to prevent it:
- Practice loading dummy rolls in daylight before attempting in darkness
- Ensure backing paper is completely removed from film before loading
- Feel for smooth, even spacing as you load film onto the reel
- Don’t force the film—if it resists, back out and restart
- Work slowly and methodically in complete darkness
- Keep hands completely dry during loading
Edge Fogging from Improper Loading
What it looks like: Bright edges on one or both sides of the film strip when scanned or printed, particularly noticeable in 120 film compared to the center.
Cause: 120 film that curls excessively wasn’t properly secured on the reel, allowing light to fog the edges. This can also occur during scanning if curled film can’t be held flat in the film holder.
How to prevent it:
- Ensure film is properly engaged in reel grooves throughout loading
- Don’t skip the final clicks or catches that secure the film
- Store developed film flat in archival sleeves to prevent excessive curl
- When scanning, use a dedicated 120 film holder with good tension
Insufficient Chemistry Coverage
Developer Cut-Off
What it looks like: A straight, undeveloped border along one edge of the film running the entire length of the roll. The affected area appears much lighter or completely clear.
Cause: Not enough developer solution in the tank to completely submerge the film on the reel.
How to prevent it:
- Know your tank’s capacity for 120 film (typically 500-600ml for single reel tanks)
- Measure chemistry carefully each time
- Account for the larger volume needed for 120 vs. 35mm
- Fill tank completely to the fill line or slightly beyond
Fixer Cut-Off
What it looks like: A straight, cloudy or milky border along one edge of the film. This area was underfixed and may turn black over time as silver continues to develop.

How to prevent it:
- Use sufficient fixer volume (same as developer requirements)
- Ensure film remains submerged throughout fixing time
- Check tank capacity markings for 120 film specifically
Chemical Problems
Insufficient Fixing
What it looks like: Film appears cloudy, milky, or has a purple/brown tint. The image may be visible but has an overall haze.
Cause: Film wasn’t fixed for long enough, fixer was exhausted, or fixer solution was too dilute.
Recovery:
- Re-fix in fresh fixer solution for the full recommended time
- Wash thoroughly after re-fixing
How to prevent it:
- Use fresh fixer within its working life
- Follow manufacturer’s capacity recommendations
- Fix for full recommended time (typically 3-5 minutes minimum)
- Test fixer with clearing time test periodically
Exhausted Developer
What it looks like: Severely underdeveloped negatives that are very thin (light) with poor shadow detail and little contrast.
Cause: Developer has exceeded its capacity or has oxidized and lost potency.
How to prevent it:
- Track the number of rolls developed and stay within capacity guidelines
- Store stock solutions in full, tightly capped bottles
- Use one-shot developers within minutes of dilution
- Date your chemistry bottles
- Watch for color changes in developer (browning indicates oxidation)
Developer Contamination
What it looks like: Purple or brown stains on negatives, or unusual color casts in black and white film.
Cause: Particles of undissolved developer, contamination from fixer, or chemicals precipitating onto the film.
How to prevent it:
- Mix powder developers completely and check for undissolved particles
- Keep developer and fixer containers separate
- Clean all equipment thoroughly between uses
- Filter developer if particles are visible
- Use dedicated containers for each chemistry type
Drying Problems
Water Spots and Drying Marks
What it looks like: Circular or irregular spots, particularly visible in clear areas. May appear as rings or mineral deposits.

Cause: Hard water drying on the film surface leaves mineral deposits. Droplets forming and drying slowly on the film create marks.
How to prevent it:
- Use distilled or filtered water for final wash
- Always use wetting agent (Photo-Flo or Ilfotol) in final rinse
- Mix wetting agent at proper dilution (over-dilution is as bad as under-dilution)
- Gently squeegee or use film clips to remove excess water
- Hang film in a dust-free environment with good air circulation
- Never use heat to speed drying (hair dryers can attract dust and cause uneven drying)
Recovery:
- For marks on the base (non-emulsion) side: very gently polish with film cleaner
- For emulsion-side marks: rewash film and treat with fresh wetting agent
Scratches and Surface Damage
What it looks like:
- Long straight scratches (tramlines): Run the entire length of the film
- Short irregular scratches: May appear as clusters or random marks
- Clear crescents: Half-moon shapes indicating film was kinked
Cause:
- Tramlines: Dirt or grit on camera pressure plate, film gate, or developing reel
- Short scratches: Rough handling of wet emulsion, squeegeeing with contaminated tools
- Crescents: Film was bent or kinked during loading onto reel
How to prevent it:
- Keep all equipment meticulously clean
- Handle wet film only by the edges
- Never squeegee 120 film by hand—the wider format makes it more vulnerable
- If using squeegee, ensure it’s spotlessly clean
- Load film onto reel gently without forcing
- Don’t attempt to straighten kinked film during loading
Exposure-Related Issues (Often Blamed on Development)
Clear Film with Edge Markings
What it looks like: Film is completely clear except for frame numbers and other edge markings printed by the manufacturer.
Cause: Film was properly developed but never exposed. This indicates a camera problem, not a development error.
Diagnosis:
- Check camera shutter is firing (visible test at slow speeds)
- Verify film is advancing between frames
- Test that rewind knob turns when advancing (for cameras with this feature)
- For Hasselblad and other leaf shutter systems, test lens at various speeds
Completely Clear Film (No Edge Markings)
What it looks like: Film is absolutely clear with no image or manufacturer markings.
Cause: Film was fixed before being developed, or no developer was used at all. This is a chemical order error.
Prevention: Always double-check your chemical sequence:
- Developer
- Stop bath (optional)
- Fixer
- Wash
Medium Format-Specific Considerations
Film Handling During Loading
The larger size of 120 film compared to 35mm makes certain problems more likely:
- Backing paper confusion: Always completely remove the backing paper before loading. Some photographers accidentally load backing paper onto the reel.
- Moisture sensitivity: The larger surface area means 120 film is more affected by humid hands. Keep hands absolutely dry.
- Reel mismatch: Ensure you’re using 120-specific reels. Using 35mm reels with 120 film is impossible, but using adjustable reels set incorrectly can cause loading problems.
Scanning Issues
Some “development” problems are actually scanning problems:
- Curled film brightness variations: 120 film tends to curl more than 35mm, causing edges to scan brighter than the center. This isn’t a development issue but a scanning problem requiring better film flattening.
- Newton rings: Not a development problem, but caused by film touching glass during scanning.
Best Practices Summary
To minimize development problems with 120 film:
- Temperature control is critical: Use a water bath to stabilize all chemistry to within ±0.5°C
- Practice loading: Work with a dummy roll in daylight until loading is automatic
- Agitate consistently: Follow manufacturer guidelines precisely
- Measure carefully: Know your tank’s capacity for 120 film and measure all chemistry
- Track chemistry: Date bottles and count rolls to stay within capacity
- Work clean: Keep all equipment spotless and work in a clean environment
- Take your time: Medium format demands deliberate, careful technique
- Document your process: Keep notes on development to identify patterns in problems
When to Seek Professional Help
Some situations warrant sending film to a professional lab:
- Irreplaceable images from important shoots
- Learning phase—compare professional results to your home development
- Vintage or specialty films with unusual processing requirements
- When you lack proper temperature control equipment
- After repeated problems you can’t diagnose
Most 120 film development problems are preventable with careful technique, proper temperature control, and consistent chemistry handling. While the larger format presents unique challenges compared to 35mm, it also offers superior image quality that makes careful processing worthwhile.
Start each session with a clear mental checklist, work methodically, and don’t rush. The extra care required for medium format development becomes second nature with practice, and the reward is consistently beautiful negatives from your Hasselblad, Mamiya, Pentax 67, or other medium format system.
Remember: every problem is a learning opportunity. Document what went wrong, adjust your technique, and your next roll will be better.
Did your film experience issues before development, such as film fogging? Check my article on Fogged Film.
Purchasing gear from the above link helps me keep the site going!