Your film is holding more information than you think. If your scanned negatives look flat, lack shadow detail, or feel like they can’t compete with digital captures, the problem almost certainly isn’t the film — it’s the digitization process. A well-exposed color negative on modern film stock can record 12 to 14 stops of scene information, rivaling or exceeding many digital sensors. But getting that information out of the negative and into a usable file requires intention at every step of the scanning workflow.
This article came to be because of the image below. If you read my previous article on light leaks then you know about a few rolls I shot on the Pentax 67 when the rear light seal was missing.
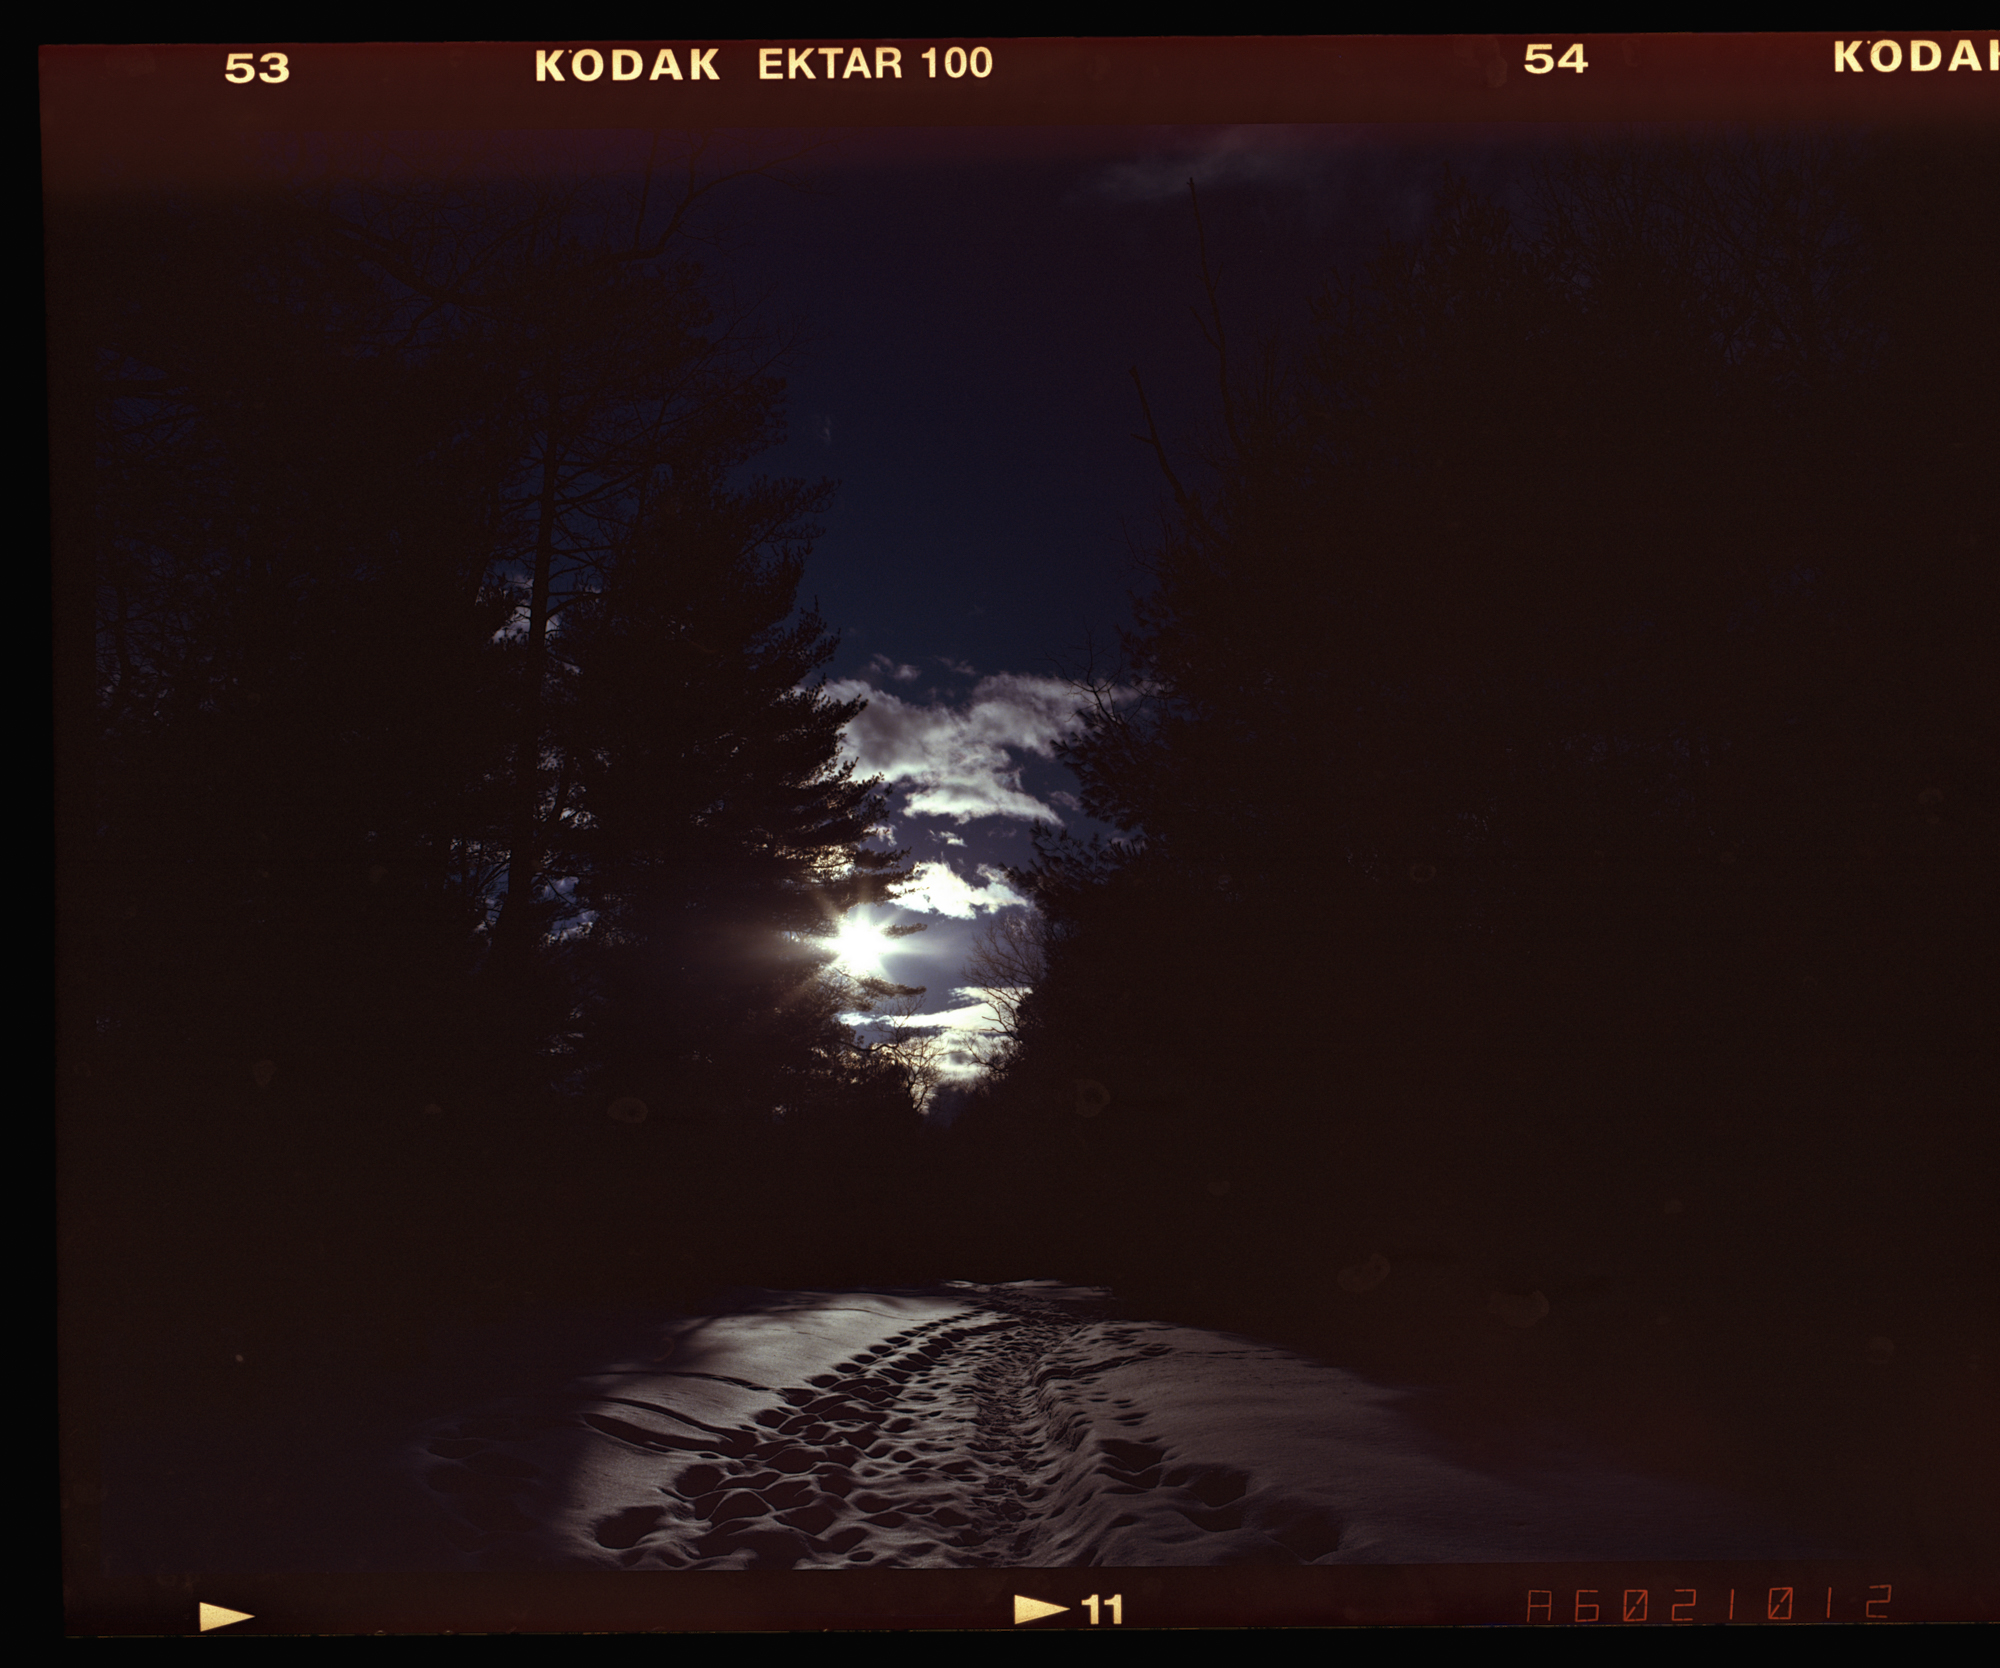
This image is very underexposed. Had I shot this with the GFX 100s, I would just pull the exposure in Lightroom and recover the shadows. Below is what happened when I tried the exposure slider with my scanned negative from the Epson V850 scanner:
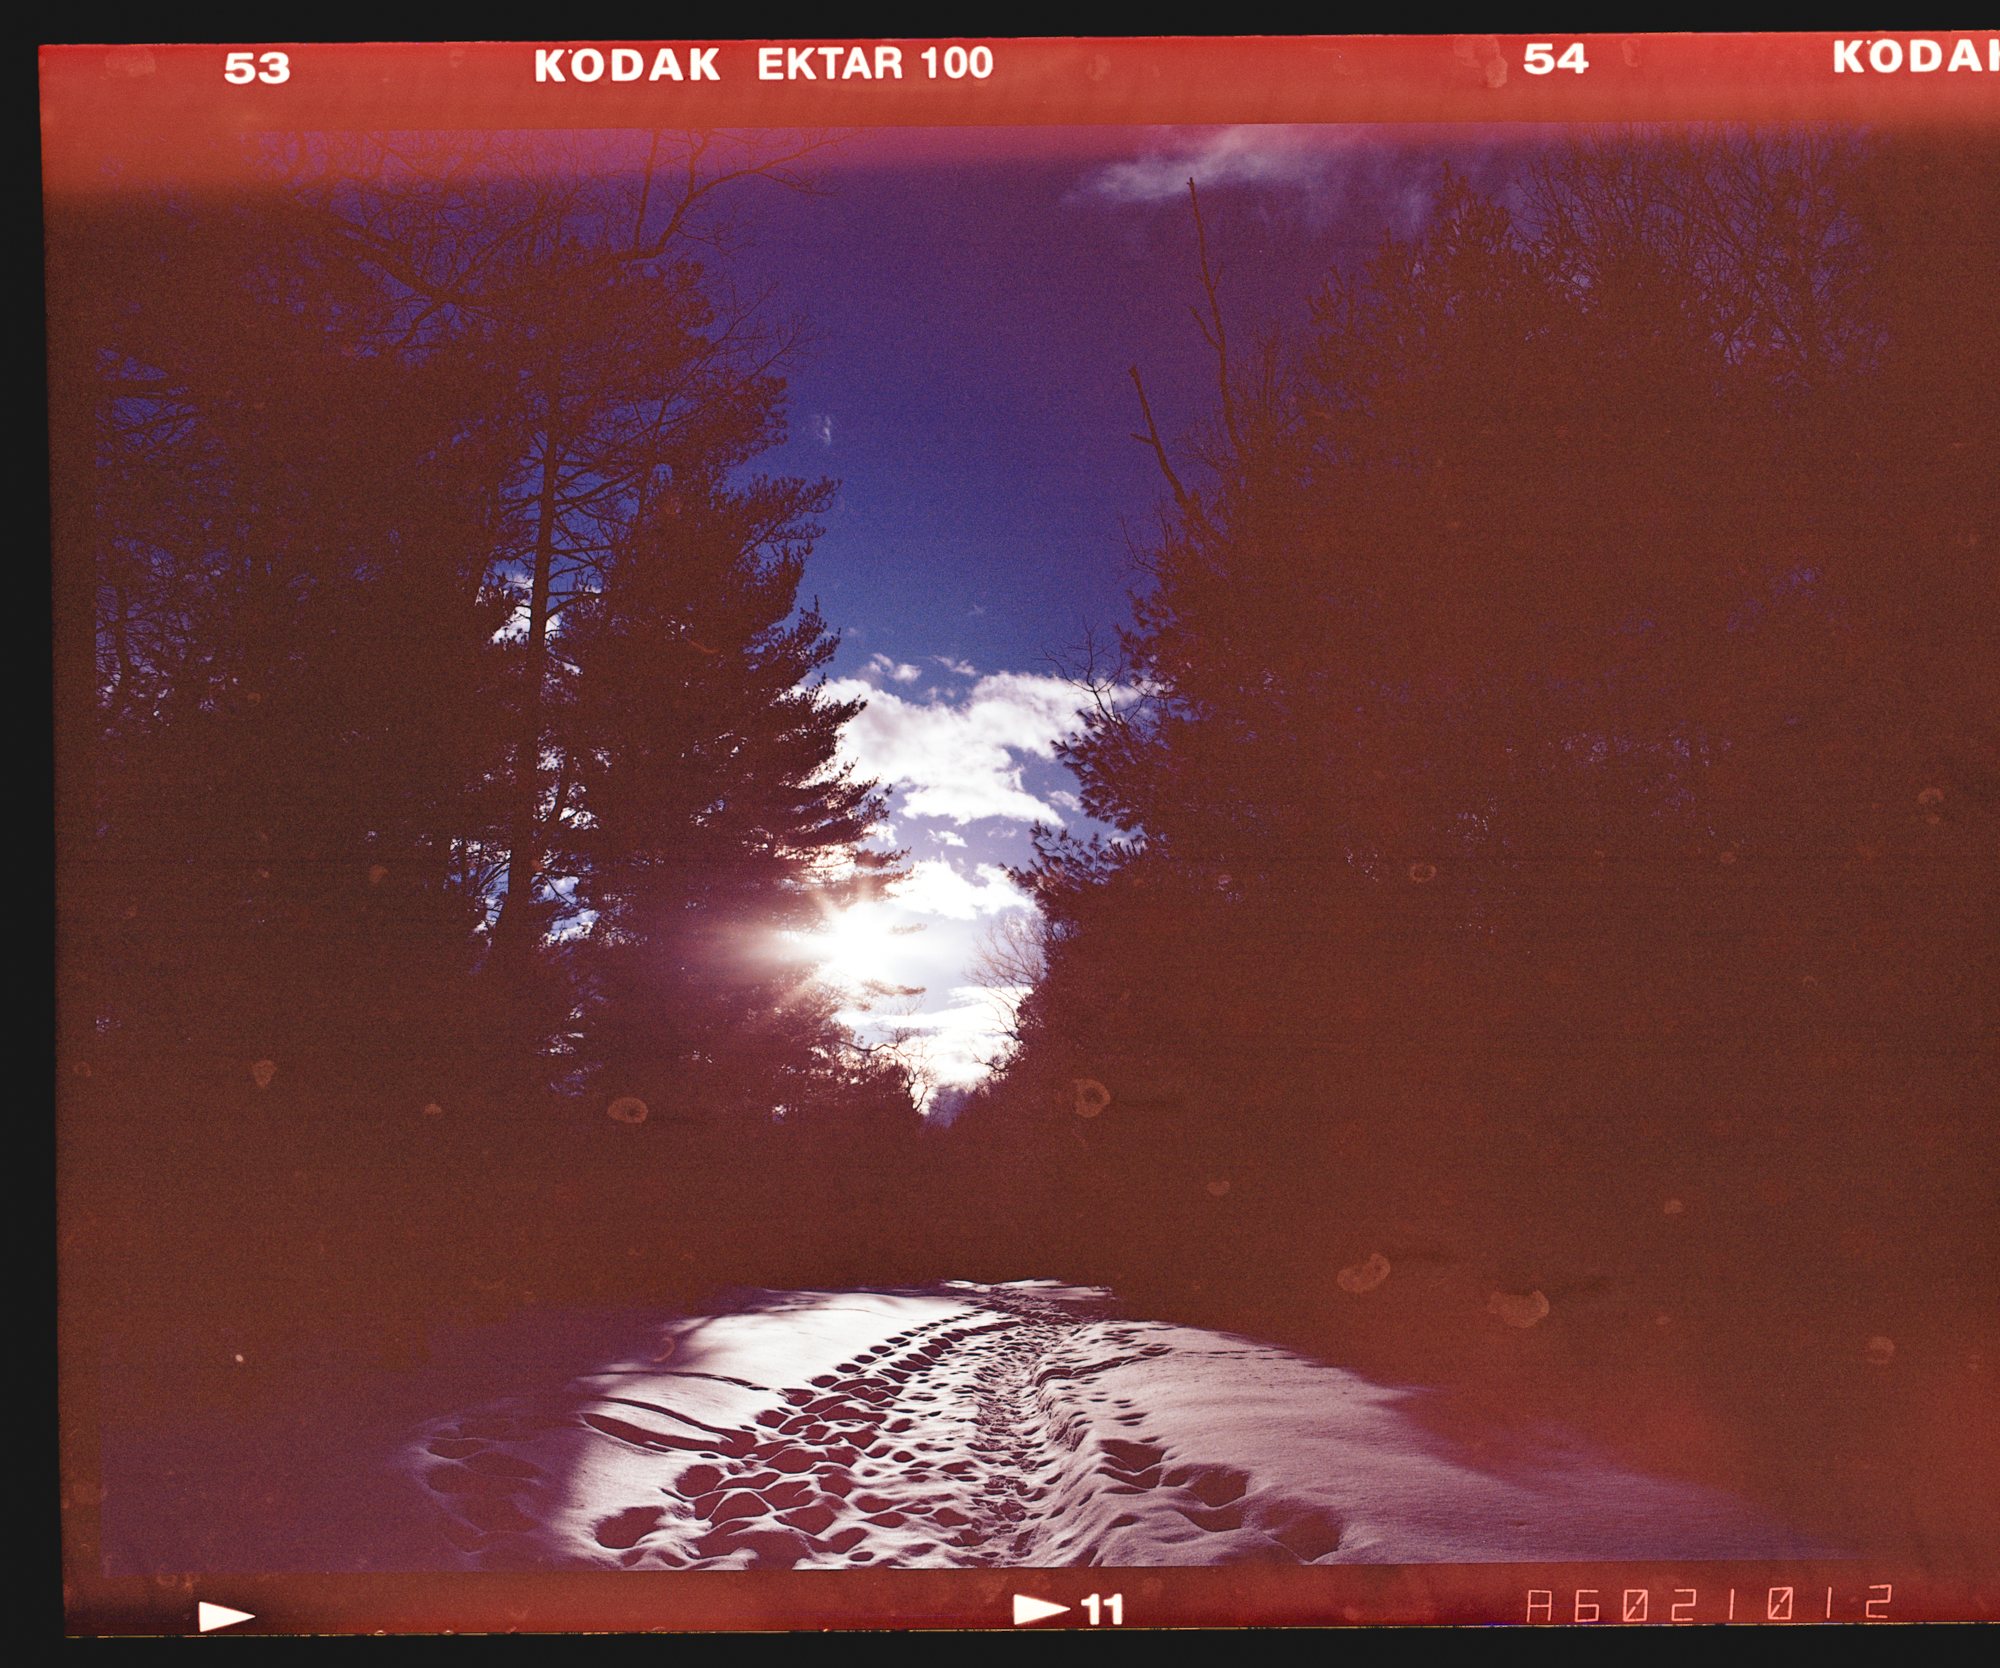
Now the light leak is surprisingly visible, as well as the fact that I didn’t use a wetting agent to combat the hard water spots, and there’s virtually no additional detail in the shadows. So how did I mess up, and how do we fix this?
Here’s how to stop leaving dynamic range on the table.
Scan as a Positive, Not a Negative
Most scanning software offers a “negative” mode that handles the inversion for you automatically. This is convenient, but it comes at a cost. When the software inverts the image, it also makes decisions about where to set your black point, white point, and midtone balance — and those decisions almost always clip the extremes of your tonal range before you get any say in the matter.
Instead, scan your negatives as positives. This gives you the raw, uninverted density data from the negative, with no auto-exposure adjustments baked in. You’ll get an orange-masked image that looks nothing like a photograph, and that’s exactly what you want. The inversion and color correction happen later, in software where you have full control. In VueScan, this means scanning in “transparency” mode rather than “negative” mode. In SilverFast, it means disabling NegaFix and scanning as a positive transparency. In Epson Scan, use Professional Mode, set the film type to positive, and disable all auto-corrections.
The difference can be dramatic. Auto-negative modes routinely clip one to two full stops of highlight and shadow detail that the scanner actually captured — detail you’ll never get back once it’s gone.
Always Scan in 16-Bit
This one is non-negotiable. An 8-bit file gives you 256 discrete tonal levels per color channel. A 16-bit file gives you 65,536. When you’re trying to extract subtle gradations from the dense shadow areas of a negative or pull detail from thin highlights, that difference is everything.
An 8-bit scan may look fine at first glance, but the moment you start pushing curves or adjusting levels in post, you’ll see posterization — abrupt tonal jumps where smooth gradients should be. A 16-bit scan gives you the headroom to make aggressive adjustments without falling apart. Always save as TIFF. Never scan to JPEG at any point in your workflow, even as a “preview” you plan to work from later. The compression artifacts and bit-depth reduction are irreversible.
Disable Every Automatic Adjustment
Scanner software ships with a host of “helpful” features that are actively hostile to dynamic range. Auto-exposure, auto-contrast, auto-color balance, Digital ICE, sharpening, grain reduction — turn all of it off. Every one of these processes makes destructive decisions about your tonal data before it reaches your editing software.
Auto-exposure is the worst offender. It evaluates the density of each frame and adjusts the scanner’s exposure to produce a “normal” looking result. For a contrasty scene — backlit subjects, bright skies with deep shadows, anything you’d actually need dynamic range for — the auto-exposure will dutifully clip your highlights or crush your shadows to achieve that “normal” histogram. You lose exactly the information you most need to preserve.
Set your scanner’s exposure manually. If your software supports multi-exposure or multi-pass scanning, use it — this can genuinely extend the usable density range of your scanner by capturing separate passes for highlights and shadows and combining them.
Understand Your Scanner’s Actual Dmax
Every scanner has a maximum density (Dmax) specification that represents the densest area of a negative it can meaningfully read. This number is important, and it’s almost certainly lower than what the manufacturer claims.
Consumer flatbed scanners like the Epson V600 or V850 are typically rated around Dmax 4.0, but real-world testing consistently puts them closer to 3.5 or even 3.2 for usable data. Above that density, what the scanner returns is noise, not image data. Dedicated film scanners like the Plustek OpticFilm series do better, reaching a true Dmax of around 3.6 to 3.8. Drum scanners — the gold standard — can achieve a true Dmax above 4.0.
Why does this matter? Because a well-exposed color negative can have shadow densities exceeding 3.0 or even 3.5 on the deepest areas. If your scanner maxes out at a true Dmax of 3.2, everything beyond that is getting compressed into a featureless dark mass. The detail is in the negative. Your scanner just can’t see it.
This is the single biggest hardware limitation in film scanning, and it’s the primary reason scanned negatives often feel like they have less dynamic range than they should.
Choose Your Conversion Software Carefully
Once you have a raw, positive, 16-bit scan, you need to convert it from an inverted, orange-masked negative into a positive image. The software you use for this step has an outsized impact on how much dynamic range ends up in your final file.
Basic scanner software and even Photoshop’s simple inversion (Ctrl+I) will give you a usable image, but the conversion is crude. Color negative film doesn’t have a simple linear relationship between density and exposure — each of the three color layers (cyan, magenta, yellow) has a different characteristic curve, and the orange mask adds another variable. Proper conversion requires accounting for all of this.
Negative Lab Pro, a plugin for Lightroom, is the current standard for a reason. It analyzes the orange mask and applies per-channel tone curves that respect each film stock’s actual response characteristics. The result is noticeably better highlight and shadow separation compared to manual inversion. Its tonal controls also let you push and pull the conversion without clipping in ways that a simple curves adjustment can’t match.
Grain2Pixel is another strong option that takes a different approach, using a film-stock-specific profiling system to map densities. Both are significant upgrades over doing the math yourself.
Expose for the Shadows, Scan for the Highlights
This is the oldest advice in film photography, and it applies doubly when you’re scanning. Negative film has asymmetric latitude — it handles overexposure far more gracefully than underexposure. An overexposed negative produces denser areas in the highlights, which hold detail beautifully. An underexposed negative produces thin shadow areas where there simply isn’t enough density differential for a scanner to extract meaningful information.
When in doubt, give an extra stop of exposure. That denser negative will reward you during scanning with richer shadows, smoother gradations, and more usable data across the entire tonal range. The highlights won’t block up — color negative film’s highlight rolloff is remarkably forgiving, often tolerating three or four stops of overexposure before detail truly disappears.
The Case for Camera Scanning
If you’ve optimized your scanning software settings and you’re still not getting the dynamic range you want, the bottleneck is almost certainly your scanner hardware. And the best replacement might already be sitting on your shelf.
Camera scanning — also called DSLR scanning — means using a digital camera with a macro lens to photograph your negatives on a light source, producing a high-resolution “scan” that you then process like any other raw file. It’s become the preferred method for a growing number of serious film photographers, and for good reason.
I’m in the process of creating a bracket to use the Omega C-700 enlarger as a platform for camera scanning. If this works it will give a dual use to the C-700 base and allow me to save space and money buy not having to purchase a dedicated camera scanning platform.
Why Camera Scanning Pulls More Dynamic Range
A modern digital camera sensor captures light in a fundamentally different way than a flatbed scanner’s CCD array. Scanner CCDs make a single linear pass across the negative, reading density values through a fixed optical path. The dynamic range you get is limited by the sensor’s ability to distinguish between very close density values at the extremes — and as we’ve discussed, that ability falls off sharply in the dense shadow regions of a negative.
A camera sensor, by contrast, captures the entire frame in a single exposure with a much wider native dynamic range. A good modern sensor — whether APS-C, full frame, or medium format digital — delivers 13 to 14+ stops of usable dynamic range in a single raw capture. That means it can differentiate tonal values in the densest parts of your negative that a flatbed scanner simply cannot see.
The result is noticeably better shadow detail, smoother tonal transitions in the extremes, and an overall rendering that more faithfully represents what the film actually captured. Photographers who switch from flatbed scanning to camera scanning consistently report that their negatives suddenly “come alive” — particularly in the shadows and deep midtones.
Resolution Advantages
A high-resolution camera can match or exceed dedicated film scanner resolution. A 100-megapixel medium format sensor photographing a 6×7 negative captures extraordinary detail — far beyond what any flatbed can achieve and competitive with all but the best drum scans. Even a 45-megapixel full-frame body will outresolve most flatbed scanners on medium format film.
The image below is a 100% crop comparison of the GFX 100s (Left Image), and the Epson V850 (Right Image).
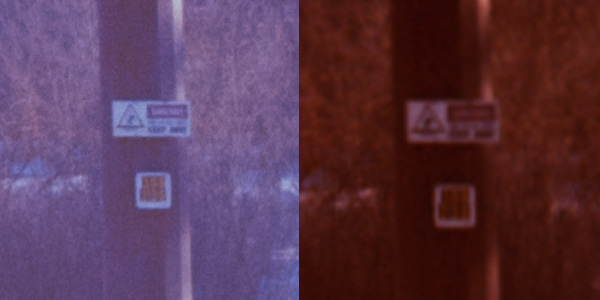
To be fair the Epson V850 was set to 300ppi, not max, and this wasn’t a wet scan, but the GFX had an image in less than a second.
Speed
Camera scanning is dramatically faster than flatbed scanning. A flatbed pass at high resolution can take several minutes per frame. Camera scanning takes seconds — literally. You can digitize an entire roll of 120 film in ten or fifteen minutes, including setup. For photographers with a backlog of unscanned rolls, this alone can be transformative.
The Setup
A camera scanning rig doesn’t require much. You need a camera body, a macro lens capable of at least 1:2 magnification (1:1 is ideal for smaller formats), a copy stand or tripod pointed straight down, a light source, and a film holder.
For the light source, even illumination is critical. A dedicated copy light like the Skier Sunray Copy Box or Negative Supply light source is ideal. A tablet or monitor displaying a white screen can work in a pinch, but purpose-built light sources provide better color consistency and more even illumination. The Kaiser Slimlite Plano is another popular, affordable option.
For film holders, options range from simple glass sandwich holders (use anti-Newton ring glass) to dedicated products from Negative Supply, Valoi, or Essential Film Holder. The film needs to be held flat and at a consistent distance from the light source. Any curl or buckle will throw part of the frame out of the plane of focus.
Shoot in raw, obviously. Set your white balance to the light source, expose to the right of the histogram without clipping (you want to capture the maximum density information), and use a remote shutter release or timer to eliminate vibration.
Processing the Camera Scan
Once you’ve captured your negatives as raw files, the workflow mirrors what we discussed earlier — convert from the positive capture to a negative using Negative Lab Pro or similar software. Because you’re starting with a raw file from a high-quality sensor rather than a compressed scan from a flatbed, you have significantly more latitude in processing. Shadow recovery is cleaner, highlight detail is better preserved, and color fidelity benefits from the raw file’s wider gamut.
Putting It All Together
The dynamic range in your negatives hasn’t gone anywhere. It’s been there all along, locked in the silver halide grain and dye layers, waiting for a digitization process that can do it justice. Whether you optimize your flatbed workflow or make the jump to camera scanning, the principles are the same: capture the maximum amount of tonal information at the scanning stage by eliminating automatic processing, working in 16-bit, and using hardware and software that can reach into the extremes of your negative’s density range.
Film has a beauty that comes from its tonal response — the way highlights roll off into pure white, the way shadows hold texture and color even in deep underexposure. A good scanning workflow doesn’t add anything to the image. It simply stops taking away what the film already gave you.
Purchasing gear from the above link helps me keep the site going!