

The Complete Guide to Scanning Medium Format 120 Film
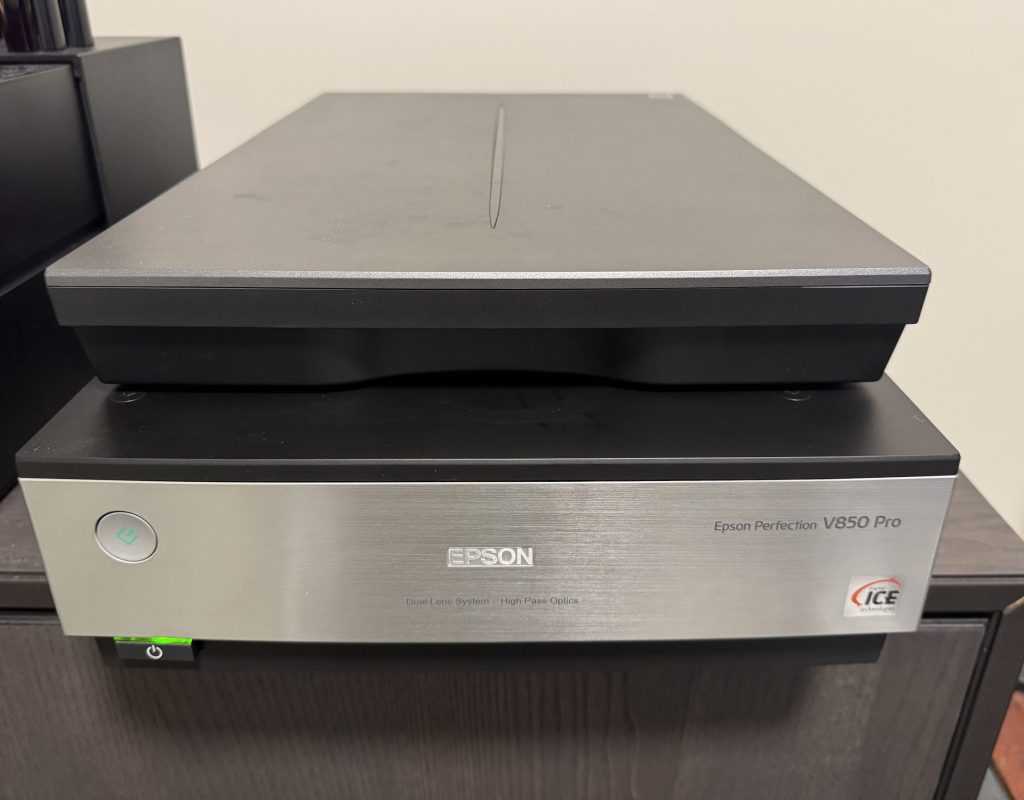
The Epson Perfection V850 Pro is widely regarded as the gold standard among flatbed film scanners for serious photographers. While drum scanners and dedicated film scanners like the Hasselblad Flextight exist at higher price points, the V850 occupies a sweet spot where exceptional quality meets practical workflow for medium format film shooters. After extensive use scanning everything from 6×4.5 to 6×9 negatives and transparencies, here’s everything you need to know about getting the best results from this scanner.
Overview and Key Specifications
The V850 Pro is Epson’s flagship flatbed scanner, designed specifically with film photographers in mind. It features a dual-lens optical system — one lens optimized for reflective scanning and a separate lens optimized for film — which sets it apart from consumer-grade flatbeds that use a single lens for everything.
Key specifications include an optical resolution of 6400 x 9600 dpi, a maximum optical density (Dmax) of 4.0, and a scanning area of 8.5 x 11.7 inches. The scanner uses a white LED light source with ReadyScan technology, meaning there’s no warm-up time required. It connects via USB 2.0, which is admittedly dated, but scan times are largely limited by the optical carriage speed rather than data transfer.
The scanner ships with Epson Scan 2 software, SilverFast SE 8, and a set of film holders for 35mm strips, 35mm mounted slides, medium format 120 film, and 4×5 sheet film. The included medium format holder accommodates strips of 120 film and is adequate for getting started, though many users upgrade to aftermarket holders or wet mounting systems for better results.
What’s in the Box
When you unpack the V850, you’ll find the scanner unit itself, a transparency unit (the lid, which contains the light source for scanning film), a power supply, USB cable, and a set of four film holders:
- 35mm strip holder — holds two strips of six frames
- 35mm slide holder — holds twelve mounted slides
- Medium format (120) holder — holds two strips of 120 film in various frame configurations (6×4.5, 6×6, 6×7, 6×9)
- 4×5 sheet film holder — holds two sheets of large format film
You’ll also get a document mat for reflective scanning and software installation discs, though you’ll want to download the latest versions of everything from Epson’s website.
Understanding the Calibration Area
Before we dive into scanning techniques, there’s a critical concept that trips up many V850 users, especially those who move to third-party or wet mounting holders: the scanner’s calibration area.
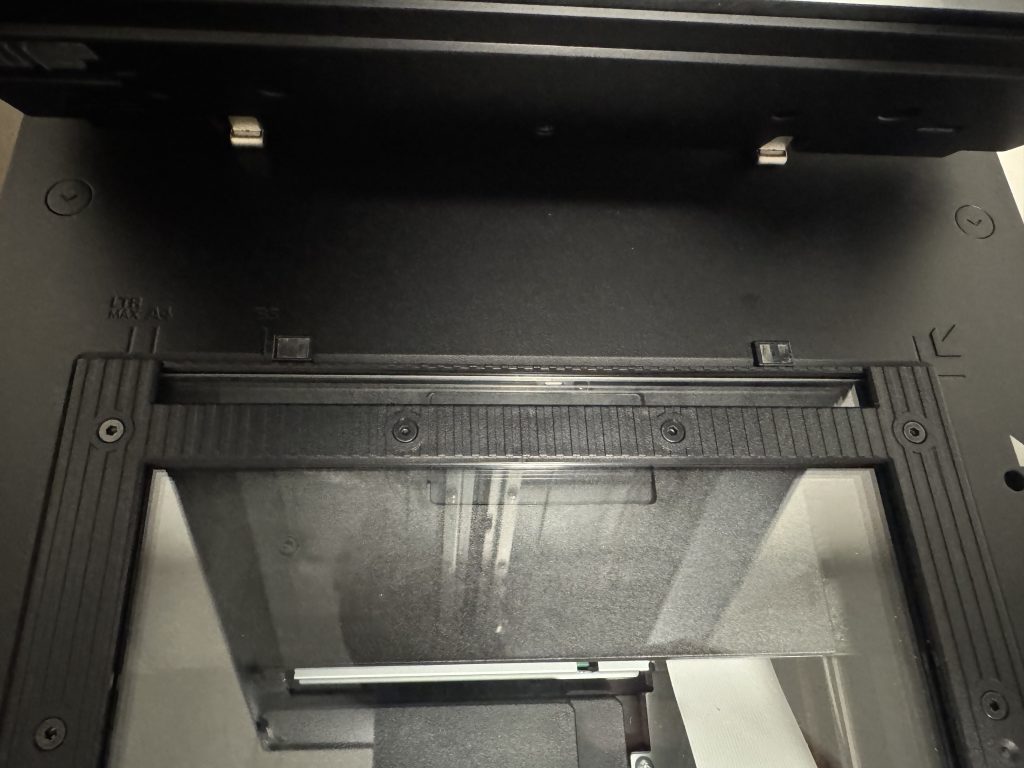
At the very top of the scanner glass — roughly the first inch — the V850 performs an automatic calibration pass before each scan. During this pass, the scanner reads through this area to establish baseline exposure and color reference points. This calibration area must remain completely clear and clean. You cannot place any film, holder edges, or obstructions in this zone.
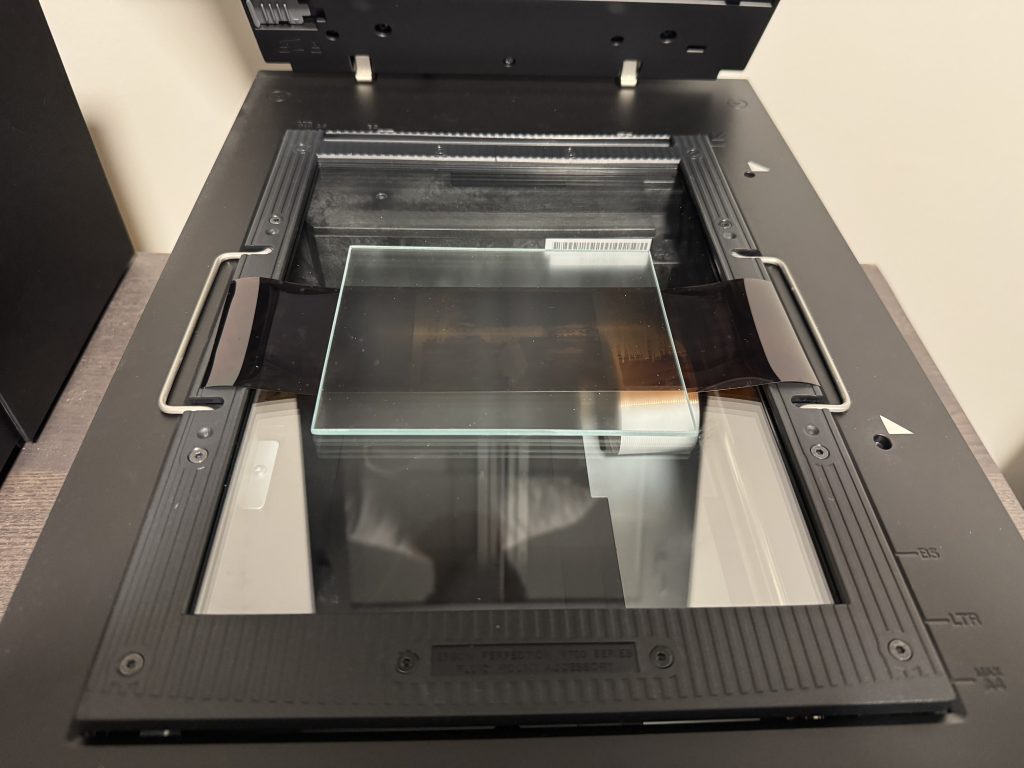
The factory film holders that ship with the V850 are specifically designed to avoid this area. They’re also designed with open calibration windows — the small rectangular cutouts at the top of each holder have no glass or plastic in them. This is intentional. The scanner needs to read through the transparency unit’s light source unobstructed for proper calibration.
Here’s where problems arise: many third-party film holders and wet mounting systems use glass or plastic throughout, including over the calibration window area. If that glass or plastic is not perfectly clean — and I mean perfectly — you can get banding, color shifts, density irregularities, and other artifacts that are maddening to troubleshoot. Dust, fingerprints, dried fluid residue, or even a slight haze on the calibration window glass will throw off the scanner’s baseline readings, and the resulting artifacts can appear anywhere in the scan, not just at the top.
If you’re using any holder or wet mount setup with glass in the calibration window, clean it meticulously before every scanning session. Use a lint-free microfiber cloth and a dedicated optical cleaning solution. Inspect it under a bright light at an angle to check for residue or smudges. I’ve had scanning sessions go sideways with strange horizontal banding and inconsistent density, only to trace it back to a slightly dirty calibration window on a wet mounting frame. It’s one of those problems that can waste hours of your time before you figure out what’s happening.
Software Options
Epson Scan 2
Epson Scan 2 is the bundled software and offers a straightforward, no-frills interface. It provides basic controls for resolution, bit depth, exposure adjustments, unsharp mask, Digital ICE (infrared dust and scratch removal for color film), and manual frame selection. It’s functional and reliable, and many photographers use it as their primary scanning software with perfectly good results. The auto-exposure tends to be conservative, which is actually preferable since it’s easier to brighten a slightly dark scan than to recover blown highlights.
One limitation of Epson Scan 2 is its relatively basic color management and the fact that it doesn’t offer the same level of fine control over the analog gain settings that some photographers want. It also lacks sophisticated multi-exposure scanning capabilities.
SilverFast
SilverFast is included in an SE (Special Edition) version, with upgrades available to the Ai Studio version. SilverFast offers considerably more control than Epson Scan, including NegaFix profiles for specific film stocks, iSRD infrared-based dust removal, Multi-Exposure scanning (which captures multiple passes at different exposures and combines them for improved dynamic range), and IT8 calibration target support for creating custom scanner profiles.
The interface takes some getting used to — it’s not the most intuitive software you’ll ever encounter — but the results can be meaningfully better than Epson Scan, particularly with color negative film where proper inversion and profiling makes a significant difference. The NegaFix film profiles are one of SilverFast’s strongest features, providing film-specific inversion curves for dozens of popular stocks.
If you’re serious about getting the absolute best results, the Ai Studio version with an IT8 calibration target is worth the investment. Creating a custom scanner profile eliminates the color cast and density guesswork that comes with generic profiles.
VueScan
VueScan by Hamrick Software is a popular third-party alternative that many V850 users swear by. It offers excellent raw scanning capabilities, infrared cleaning, multi-exposure scanning, and a huge database of film profiles. VueScan can output raw scan data as DNG files, which gives you maximum flexibility for post-processing in Lightroom, Photoshop, or Negative Lab Pro. For photographers who prefer to handle color inversion and correction in post rather than at scan time, VueScan’s raw workflow is extremely appealing.
Scanning Medium Format 120 Film: Step by Step
Preparing Your Film
Before scanning, make sure your film strips are clean, dry, and as flat as possible. If you’ve recently developed the film, let it dry thoroughly — at least several hours, preferably overnight — in a dust-free environment. Film that has even slight residual moisture can stick to holder surfaces and scanner glass.
For older negatives that have developed a curl, you can place them under a clean, heavy book for a day or two with the curl side down. Stubborn curl is one of the primary reasons photographers turn to wet mounting or anti-Newton glass holders, as it keeps the film in better contact with the focal plane of the scanner. I use the wet mounting holder and anti-Newton glass without fluid when a negative is curled.
The glass holder puts the film at the correct height, and the anti-Newton glass keeps the negative flat.
Handle film by the edges only, using clean cotton gloves if possible. Fingerprints on the emulsion side are nearly impossible to remove without damaging the film, and even base-side fingerprints will show up in high-resolution scans as smudges or density variations.
Using the Factory 120 Film Holder
The included 120 film holder has adjustable frame guides that accommodate various medium format sizes. To use it:
- Open the hinged top of the holder.
- Place your film strip emulsion side down (the emulsion side is typically the concave side of curled film, and on most films, the duller or less shiny side). The image should appear correctly oriented — not mirrored — when viewed from above through the holder.
- Adjust the frame guides to match your format (6×4.5, 6×6, 6×7, or 6×9).
- Close the holder gently, making sure the film lies flat and isn’t kinked or overlapping the edges of the film channel.
- Place the holder on the scanner glass, aligning it with the positioning pins or guides along the edges of the scanner bed.
The factory holder uses small raised rails or ridges to keep the film slightly elevated above the scanner glass. This gap is calibrated to place the film near the optimal focal point of the scanner’s film lens. While this system works, it doesn’t perfectly constrain film that has significant curl, which can result in portions of the frame being slightly out of focus.
Recommended Scan Settings for Medium Format
For medium format film, here are the settings I recommend as a starting point:
Resolution: 2400 to 3200 dpi is the practical sweet spot for the V850. While the scanner claims 6400 dpi optical resolution, real-world testing by numerous reviewers has shown that effective resolution tops out around 2800 to 3200 dpi for the film scanning lens. Scanning beyond 3200 dpi mostly adds file size without capturing additional real detail. That said, 2400 dpi from a 6×7 negative produces roughly a 65-megapixel file, which is more than sufficient for very large prints.
Bit Depth: Always scan at 48-bit color (16 bits per channel) or 16-bit grayscale for black and white. This gives you maximum editing headroom in post-processing. You can always convert down to 8-bit later, but you can never recover the tonal information lost by scanning at lower bit depth.
Unsharp Mask: Turn this off in the scanning software. It’s always better to sharpen later in your editing workflow, where you have more control and can tailor sharpening to the output size and medium (screen vs. print).
Digital ICE: Enable this for color negative and color slide film. It uses an infrared channel to detect dust and scratches and removes them automatically. It works remarkably well and saves enormous amounts of retouching time. However, do not use Digital ICE with traditional silver-gelatin black and white film — the silver grain is opaque to infrared light, so the scanner interprets the entire image as a defect. Chromogenic black and white films like Ilford XP2 Super or Kodak BW400CN are compatible with Digital ICE since they use dye-based rather than silver-based images.
Exposure: Start with the auto-exposure and adjust from there. For dense negatives (overexposed or push-processed film), you may need to increase the exposure. For slides, be careful not to blow highlights — it’s better to scan slightly dark and brighten in post.
Post-Processing Workflow
Once you’ve captured your raw scans, the real work begins in post-processing. For color negative film, you’ll need to invert the negative image and correct the orange mask. If you scanned using SilverFast’s NegaFix profiles, this is handled automatically. If you captured raw scans via VueScan, Negative Lab Pro (a Lightroom plugin) has become the go-to tool for negative inversion and offers excellent results with minimal fuss.
For all film types, a typical post-processing workflow involves dust spotting (for anything Digital ICE missed), levels or curves adjustment to set black and white points, color correction, cropping, and finally sharpening for output. Working in 16-bit mode throughout gives you the latitude to make significant adjustments without introducing banding or posterization.
Wet Mounting: Getting the Best Possible Scans
Wet mounting is a technique borrowed from professional drum scanning that can significantly improve flatbed scan quality. It involves placing the film in direct optical contact with a glass or plastic surface using a thin layer of scanning fluid, which eliminates the air gap between the film and the scanning surface. This produces several benefits: it suppresses Newton rings (the interference patterns caused by film touching glass), reduces the visibility of surface scratches and minor abrasions, holds the film perfectly flat against the focal plane, and can slightly improve apparent sharpness by eliminating light scatter from an imperfect film surface.
What You’ll Need
- A wet mount scanning holder or frame. Several options exist, including the BetterScanning (now ScanTech) wet mount kit, Lomography DigitaLIZA holders, or DIY solutions using ANR (Anti-Newton Ring) glass. The holder needs to securely sandwich the film between glass surfaces with the fluid in between.
- Scanning fluid. Kami Fluid and Lumina are two popular options. These are specially formulated to have a refractive index close to that of film base, which is what allows them to optically “fill in” scratches and eliminate Newton rings. Do not use water, lighter fluid, or other improvised alternatives — they can damage film, leave residue, or have the wrong refractive index.
- Lint-free wipes or cloths. PEC-PADs are the standard for optical cleaning in photography.
- A clean, dust-free workspace. Wet mounting is a meticulous process, and contaminants will be sealed between the glass layers right in the scan plane.
The Wet Mounting Process
- Clean everything first. Clean the glass surfaces of your wet mount holder with PEC-PADs and a suitable optical cleaner. Clean the scanner glass as well. Inspect for dust, fibers, or residue.
- Pay special attention to the calibration window. As discussed earlier, if your wet mount holder has glass covering the calibration area at the top, it must be spotless. Even a faint smear of dried scanning fluid on this window can produce banding, streaking, or color anomalies across the entire scan. Clean it every single time, inspect it at an angle under good light, and clean it again if there’s any doubt.
- Apply a thin, even layer of scanning fluid. Place a few drops of fluid on the bottom glass of the holder (or the scanner glass, depending on your setup). The key word is thin — you want just enough to form a continuous film of liquid with no air bubbles, not so much that it pools or runs off the edges. Some photographers use a clean fingertip to spread the fluid; others use the edge of a PEC-PAD.
- Lay the film onto the fluid. Lower one edge of the film strip onto the fluid first, then slowly lower the rest, allowing the fluid to spread and push air bubbles out ahead of the contact line. Think of it like applying a screen protector. If you get bubbles, you can gently lift an edge and lower it again. Stubborn bubbles can sometimes be coaxed out by pressing very lightly with a clean finger through a PEC-PAD.
- Apply fluid to the top of the film using the same technique — a few drops spread thin.
- Lower the top glass of the holder carefully, again using an angled approach to avoid trapping air. You should see a smooth, continuous layer of fluid with no dry spots or bubbles when you hold the assembly up to a light.
- Place the holder on the scanner and proceed with your scan. Work relatively promptly — the fluid won’t damage the film, but you don’t want it drying out during the scanning session, as partially dried fluid can leave marks.
- After scanning, carefully disassemble the holder and gently clean the film and glass surfaces. The fluid should wipe away cleanly with a PEC-PAD. Allow the film to air dry before returning it to archival sleeves.
Is Wet Mounting Worth the Effort?
Wet mounting adds significant time to the scanning workflow. Each frame or strip requires several minutes of setup and cleanup compared to simply dropping film into a dry holder. Whether it’s worth it depends on your needs.
For exhibition prints, portfolio work, or scans that will be reproduced at large sizes, wet mounting can produce a visible improvement — particularly with film that has surface wear, light scratches, or persistent curl issues. The scratch suppression alone can save substantial retouching time on older or well-handled negatives.
For contact sheets, proof scans, or archival scanning where volume matters more than squeezing out the last bit of quality, the factory holders are perfectly adequate. Many photographers use a hybrid approach: dry scanning for initial review and selection, then wet mounting only the frames selected for final output.
Check out my article on Wet Mounting Issues for more information.
Common Problems and Troubleshooting
Banding or Horizontal Lines in Scans
This is one of the most common complaints with the V850, and the cause is almost always one of two things: a dirty calibration area or a software/driver issue.
First, check the calibration zone. Clean the top inch of the scanner glass thoroughly. If you’re using a wet mount holder or any third-party holder with glass over the calibration window, clean that glass meticulously on both sides. As I mentioned earlier, this is the single most frustrating issue I’ve dealt with — faint contamination on the calibration window glass can produce banding patterns that look like a hardware defect but are entirely caused by the scanner misreading its calibration reference.
If the glass is clean and banding persists, try updating or reinstalling the scanner driver. On macOS in particular, Epson driver updates have historically addressed banding issues. Also try scanning in a different software package to rule out a software-specific problem.
Newton Rings
Newton rings appear as rainbow-colored concentric interference patterns, most visible in areas of even tone like skies or out-of-focus backgrounds. They occur when the film base comes into near-but-not-quite contact with a glass surface, creating a thin air gap that produces optical interference.
Solutions include using Anti-Newton Ring (ANR) glass in your holder (many aftermarket holders offer this), wet mounting (the fluid eliminates the air gap entirely), or ensuring the film is held slightly away from any glass surface (which is what the factory holders attempt to do with their raised rails). Of these, wet mounting is the most effective solution.
Film Curl and Focus Issues
Medium format film, particularly 120 film that’s been tightly rolled on the spool, can have significant curl. When the film isn’t perfectly flat in the focal plane, parts of the image will be slightly soft. This is most noticeable at higher scanning resolutions and with larger format frames (6×7 and 6×9) where the film has more unsupported area.
The factory holders do a reasonable job but can’t fully constrain heavily curled film. Aftermarket holders with adjustable height and better clamping mechanisms help. Wet mounting solves the problem definitively by bonding the film flat against the glass surface. Some photographers also have success placing a clean, thin sheet of ANR glass on top of the film in the factory holder to press it flat, though this introduces the potential for Newton rings if the glass touches the emulsion.
Color Casts and Inaccurate Color
Color negative film is inherently challenging to scan because of the orange mask and the fact that different film stocks have different mask densities and color characteristics. If you’re getting persistent color casts, try using film-specific profiles in SilverFast (NegaFix) or Negative Lab Pro rather than generic negative inversion.
For the most accurate color, create a custom ICC profile for your scanner using an IT8 calibration target. SilverFast Ai Studio includes this capability, and the targets themselves are inexpensive. A custom profile accounts for the specific color response characteristics of your individual scanner, which can vary unit to unit.
Dust and Artifacts
The V850’s Digital ICE does excellent work on color film, but it can’t help with traditional black and white, and it occasionally misses larger particles or creates artifacts of its own around high-contrast edges. Keep the scanner glass and transparency unit glass obsessively clean. Use an anti-static brush or compressed air (held upright to avoid propellant spray) on both the film and the scanner surfaces before each scan.
For film that has significant dust contamination, a pre-scan cleaning with PEC-PADs and a film cleaning solution can help. Some photographers use an anti-static gun (like a Milty Zerostat) to neutralize the charge that attracts dust to film surfaces.
Slow Scan Speeds
The V850 is not a fast scanner, particularly at high resolutions with Digital ICE enabled. A 3200 dpi scan of a 6×7 frame with ICE can take several minutes. Multi-exposure scans in SilverFast take even longer since they require multiple passes. There’s not much to be done about this other than planning your scanning sessions accordingly and batching your work. Some photographers scan overnight, setting up batches before bed.
The USB 2.0 interface is a bottleneck during data transfer, though the mechanical scan speed is the bigger limiting factor. Epson has not updated the V850 with USB 3.0, which is one of the more common criticisms of a scanner that otherwise remains relevant years after its introduction.
Software Crashes or Freezing
Both Epson Scan 2 and SilverFast can be resource-hungry, particularly when scanning at high resolution and bit depth. Ensure your computer meets the recommended system requirements, keep drivers updated, and close unnecessary applications during scanning sessions. On macOS, permissions issues can sometimes cause the scanner software to lose connection — check System Preferences > Security & Privacy to ensure the software has appropriate access.
V850 vs. V800: Is the Upgrade Worth It?
The V850 Pro and V800 are extremely similar scanners. Both use the same dual-lens system, same optical resolution, and same basic hardware platform. The V850 adds two key differences: a higher-rated Dmax (4.0 vs. 3.8) and the inclusion of two sets of film holders — one standard set and one set of “wet” holders for use with scanning fluid.
In practice, the Dmax difference is subtle and most visible in very dense slide film. For the majority of scanning work, the V800 and V850 produce nearly identical results. If you already own a V800, there’s little reason to upgrade. If you’re buying new and the price difference is modest, the V850’s included wet mount holders are a nice bonus that saves you from purchasing aftermarket alternatives.
Final Thoughts
The Epson V850 Pro remains the best flatbed scanner available for medium format film photographers. It won’t match a dedicated film scanner or drum scanner in absolute resolution or dynamic range, but for the vast majority of uses — including large exhibition prints — it produces results that are more than sufficient. The dual-lens system, solid build quality, and wide software compatibility make it a reliable workhorse for any film scanning workflow.
The scanner rewards attention to detail. Keep everything clean, especially that calibration area. Take the time to set up proper scanning profiles. Consider wet mounting for your best work. And don’t scan at higher resolution than the optics actually deliver — 2400 to 3200 dpi is your practical ceiling, and that’s plenty for stunning medium format scans.
Whether you’re digitizing a backlog of decades-old negatives or scanning fresh rolls from a weekend shoot with your Pentax 67 or Hasselblad, the V850 is a tool that will serve you well for years to come.
Purchasing gear from the above link helps me keep the site going!