
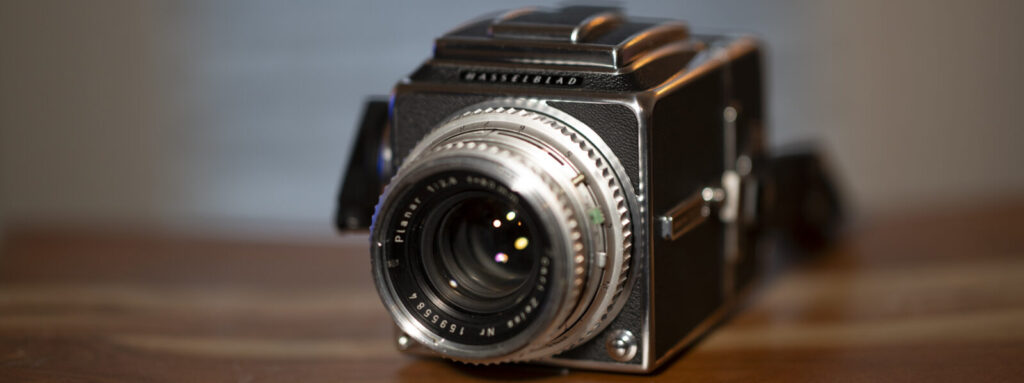
The Hasselblad 500 series represents one of the most celebrated camera systems in photographic history. Introduced in 1957, this modular 6×6 medium format system became the gold standard for professional photography, famously accompanying NASA astronauts to the moon. Today, these cameras remain beloved by film photographers for their exceptional build quality, stunning image rendition, and the meditative shooting experience they provide.
A Brief History
Victor Hasselblad introduced the 500C in 1957, revolutionizing medium format photography with its modular design. The “C” stood for the Compur leaf shutter built into the Carl Zeiss lenses, which allowed flash synchronization at all shutter speeds—a significant advantage over focal plane shutter cameras.
The system evolved through several iterations:
500C (1957–1970) — The original. Featured a removable focusing screen that required tools to change.
500C/M (1970–1994) — The “M” indicated a user-interchangeable focusing screen and other refinements. This became the most produced and popular model.
501C (1994–1997) — A simplified, more affordable version with a fixed acute-matte screen.
501CM (1997–2005) — Combined the 501’s value proposition with the interchangeable screen capability.
503CX, 503CXi, 503CW — Added features like dedicated flash metering (CX), databus capability (CXi), and a built-in winder option (CW).
Understanding the Modular System
The genius of the Hasselblad 500 system lies in its modularity. The camera breaks down into five interchangeable components:
- Body — Houses the mirror, focusing screen, and shutter release mechanism
- Lens — Contains the leaf shutter and aperture
- Film magazine — Holds the film and can be swapped mid-roll
- Viewfinder — Multiple options from waist-level to prism finders
- Focusing screen — Interchangeable on C/M models and later
This modularity means you can swap film backs between color and black-and-white mid-shoot, change from a waist-level finder to a prism for different shooting situations, or upgrade individual components without replacing the entire system.
User Guide: Operating Your Hasselblad 500
Camera Controls Overview
Before loading film, familiarize yourself with the key controls:
- Shutter release — Located on the right side of the body, requires the dark slide to be removed
- Cocking crank — On the right side, advances film and cocks the shutter simultaneously
- Lens release button — On the front of the body, press to remove lens
- Magazine release — Slide mechanism on each side of the magazine mount
- Mirror lock-up — Lever on the left side of the body (on most models)
- Self-timer lever — Located on the lens barrel
- Shutter speed ring — On the lens, typically marked in white
- Aperture ring — On the lens, typically marked in orange or red
- Focus ring — The large ribbed ring on the lens barrel
Loading Film – Hasselblad 500cm
The Hasselblad uses 120 roll film and produces 12 square 6x6cm frames per roll. Loading film requires patience at first, but becomes second nature with practice.
Step 1: Remove the magazine from the camera body. Slide both release catches simultaneously and pull the magazine away. Never remove a magazine without inserting the dark slide first.
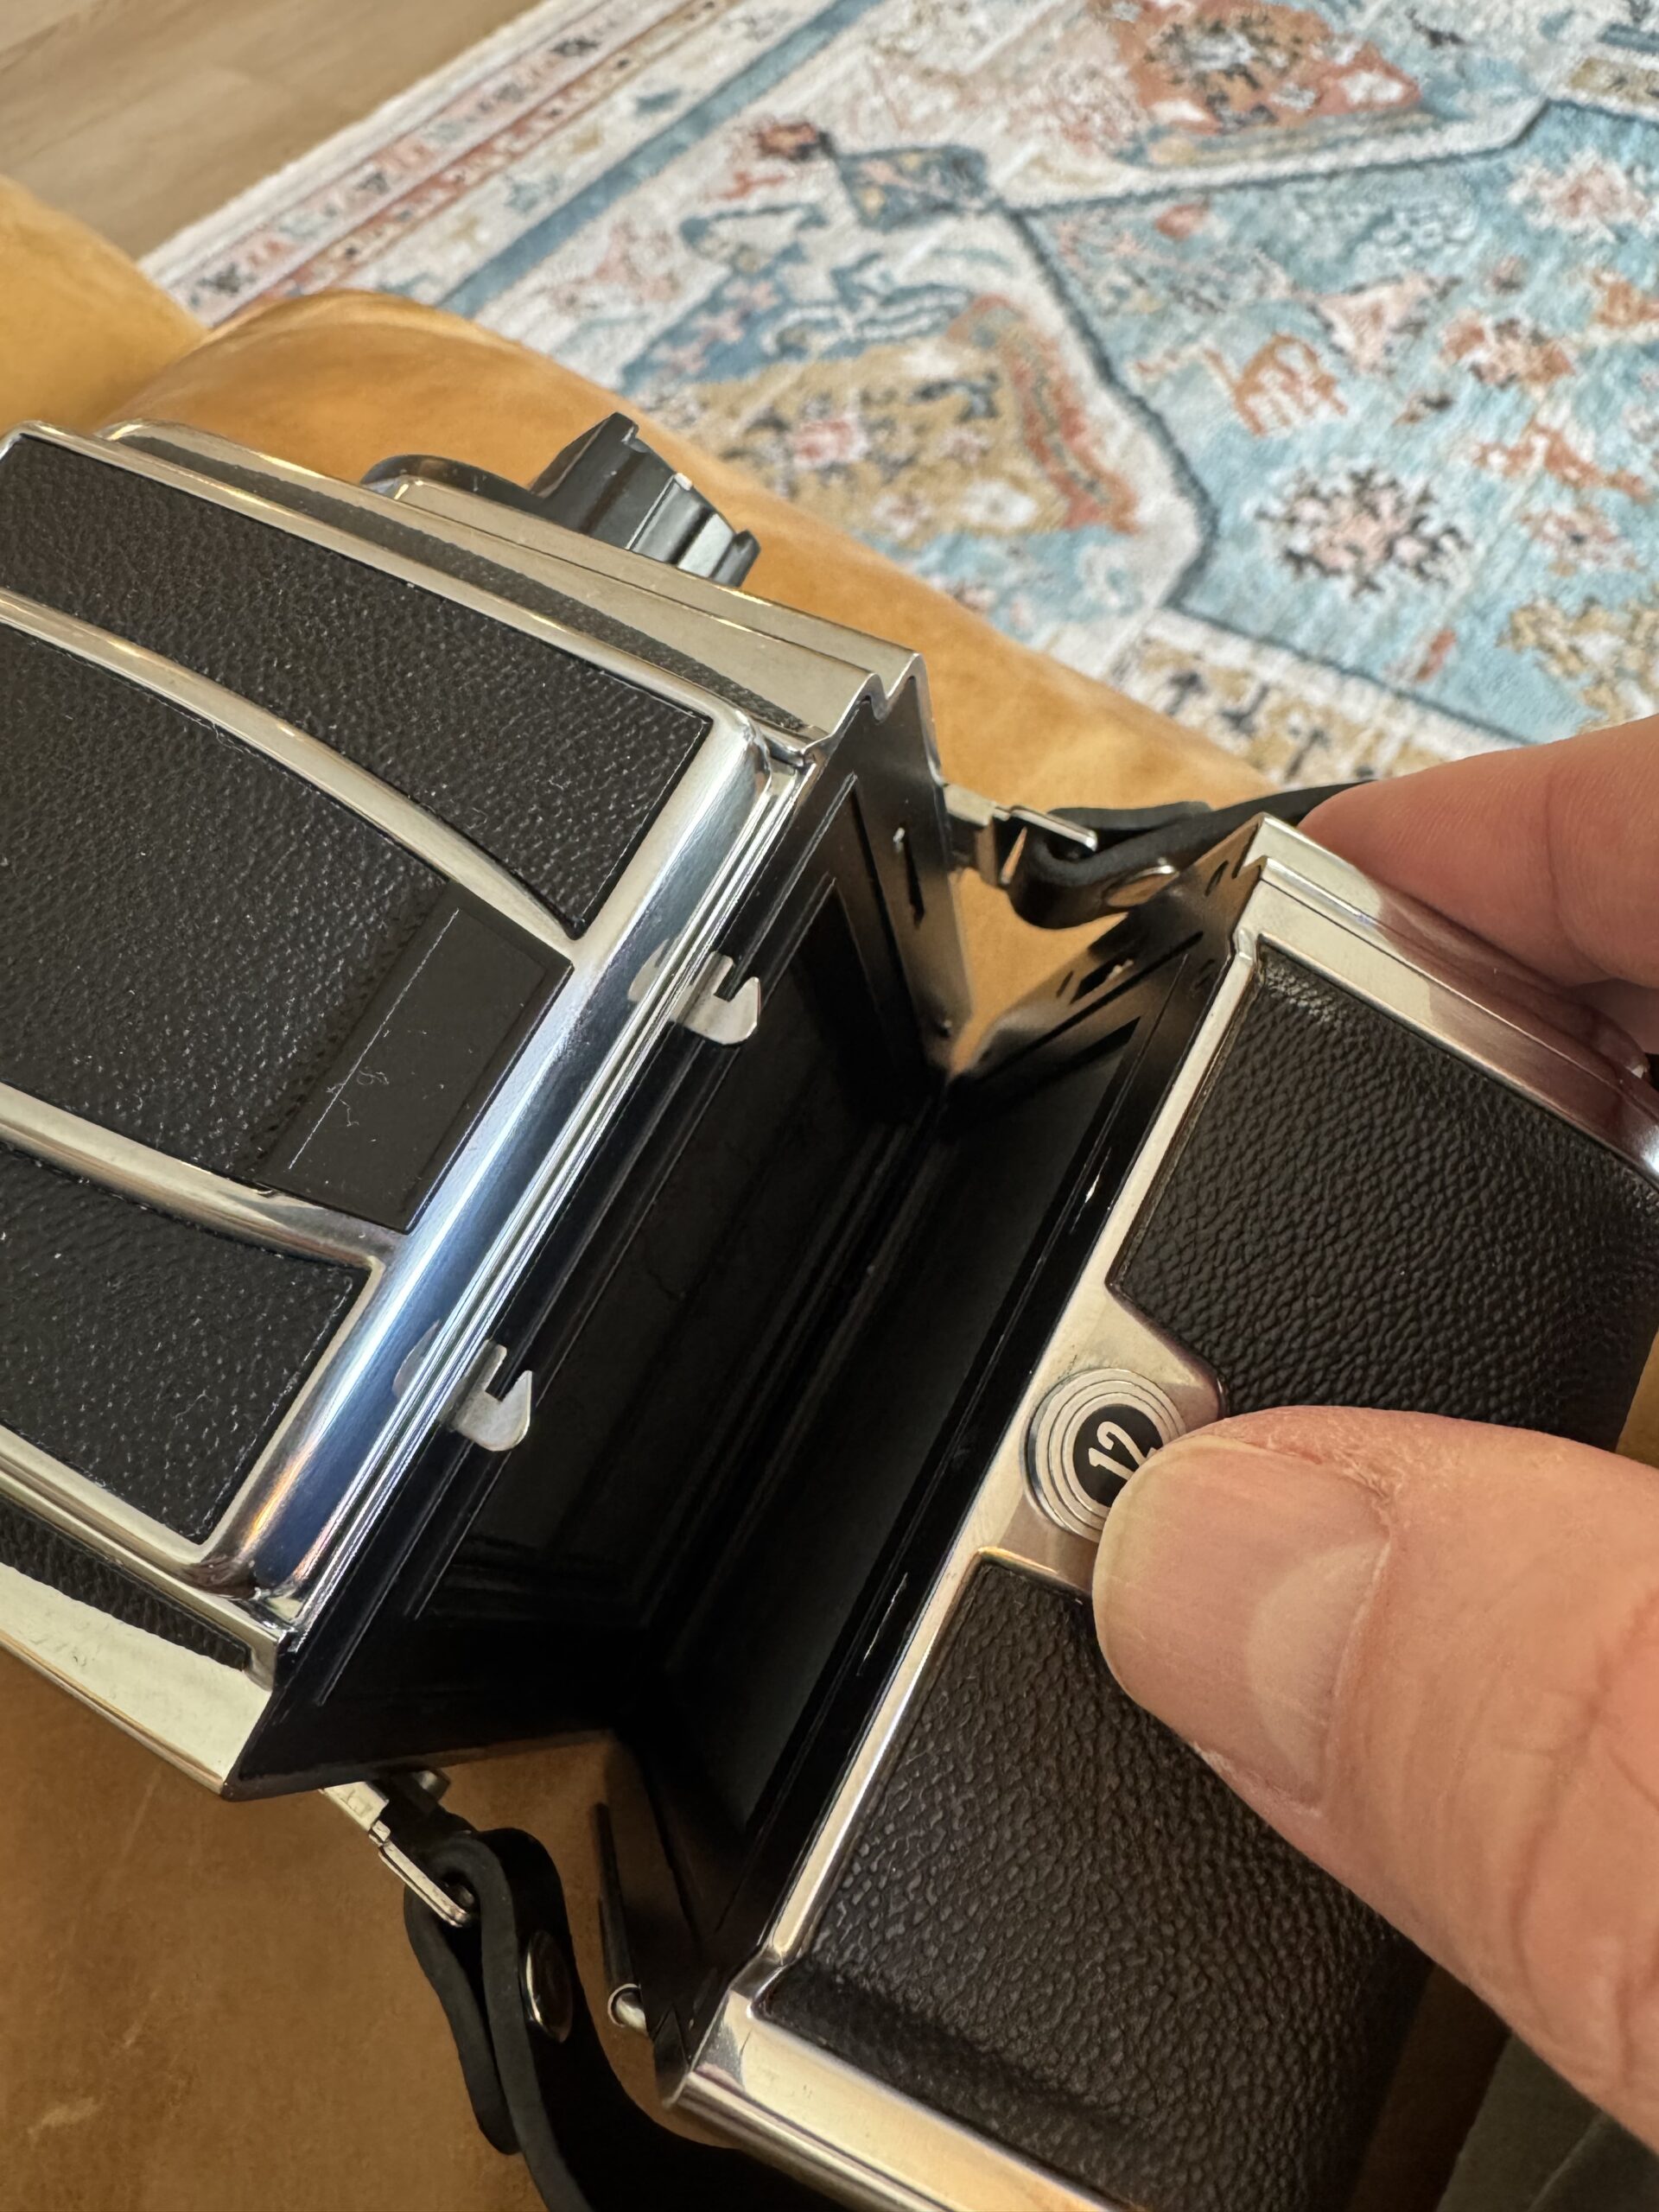
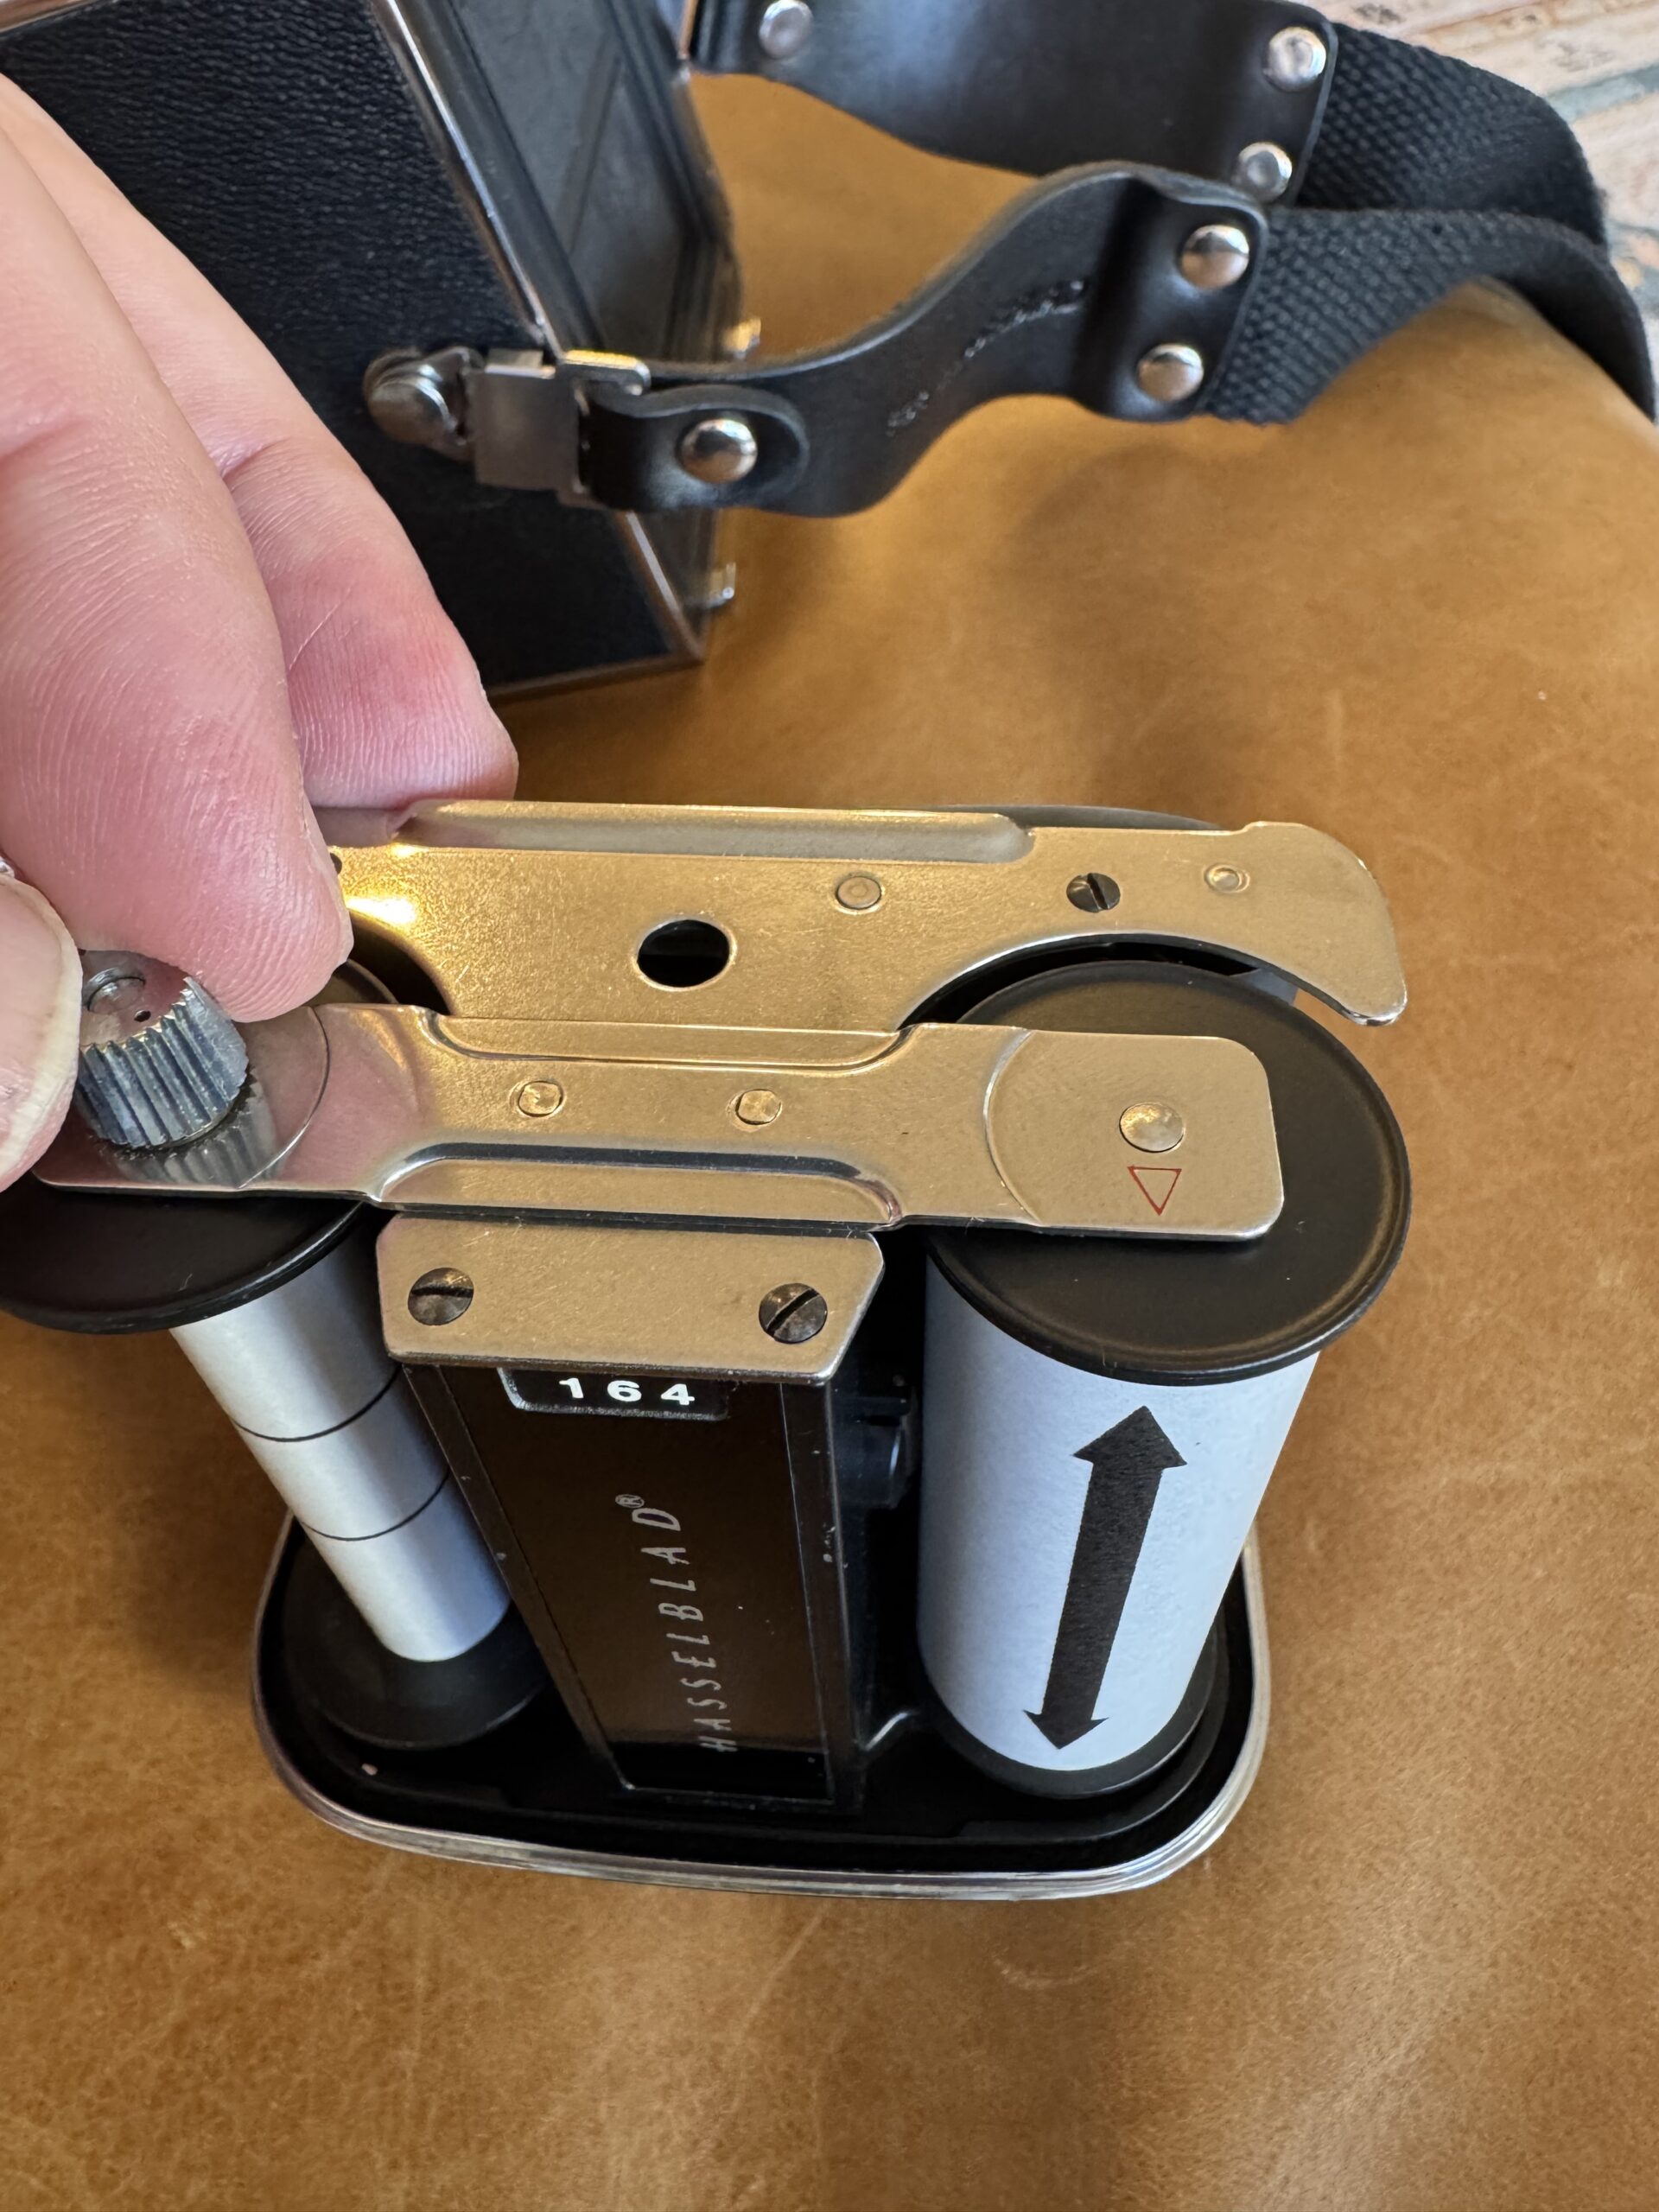
Step 2: Remove the magazine insert. Press the release key on the bottom of the magazine and slide out the insert. The insert has two spools—a supply side and a take-up side.
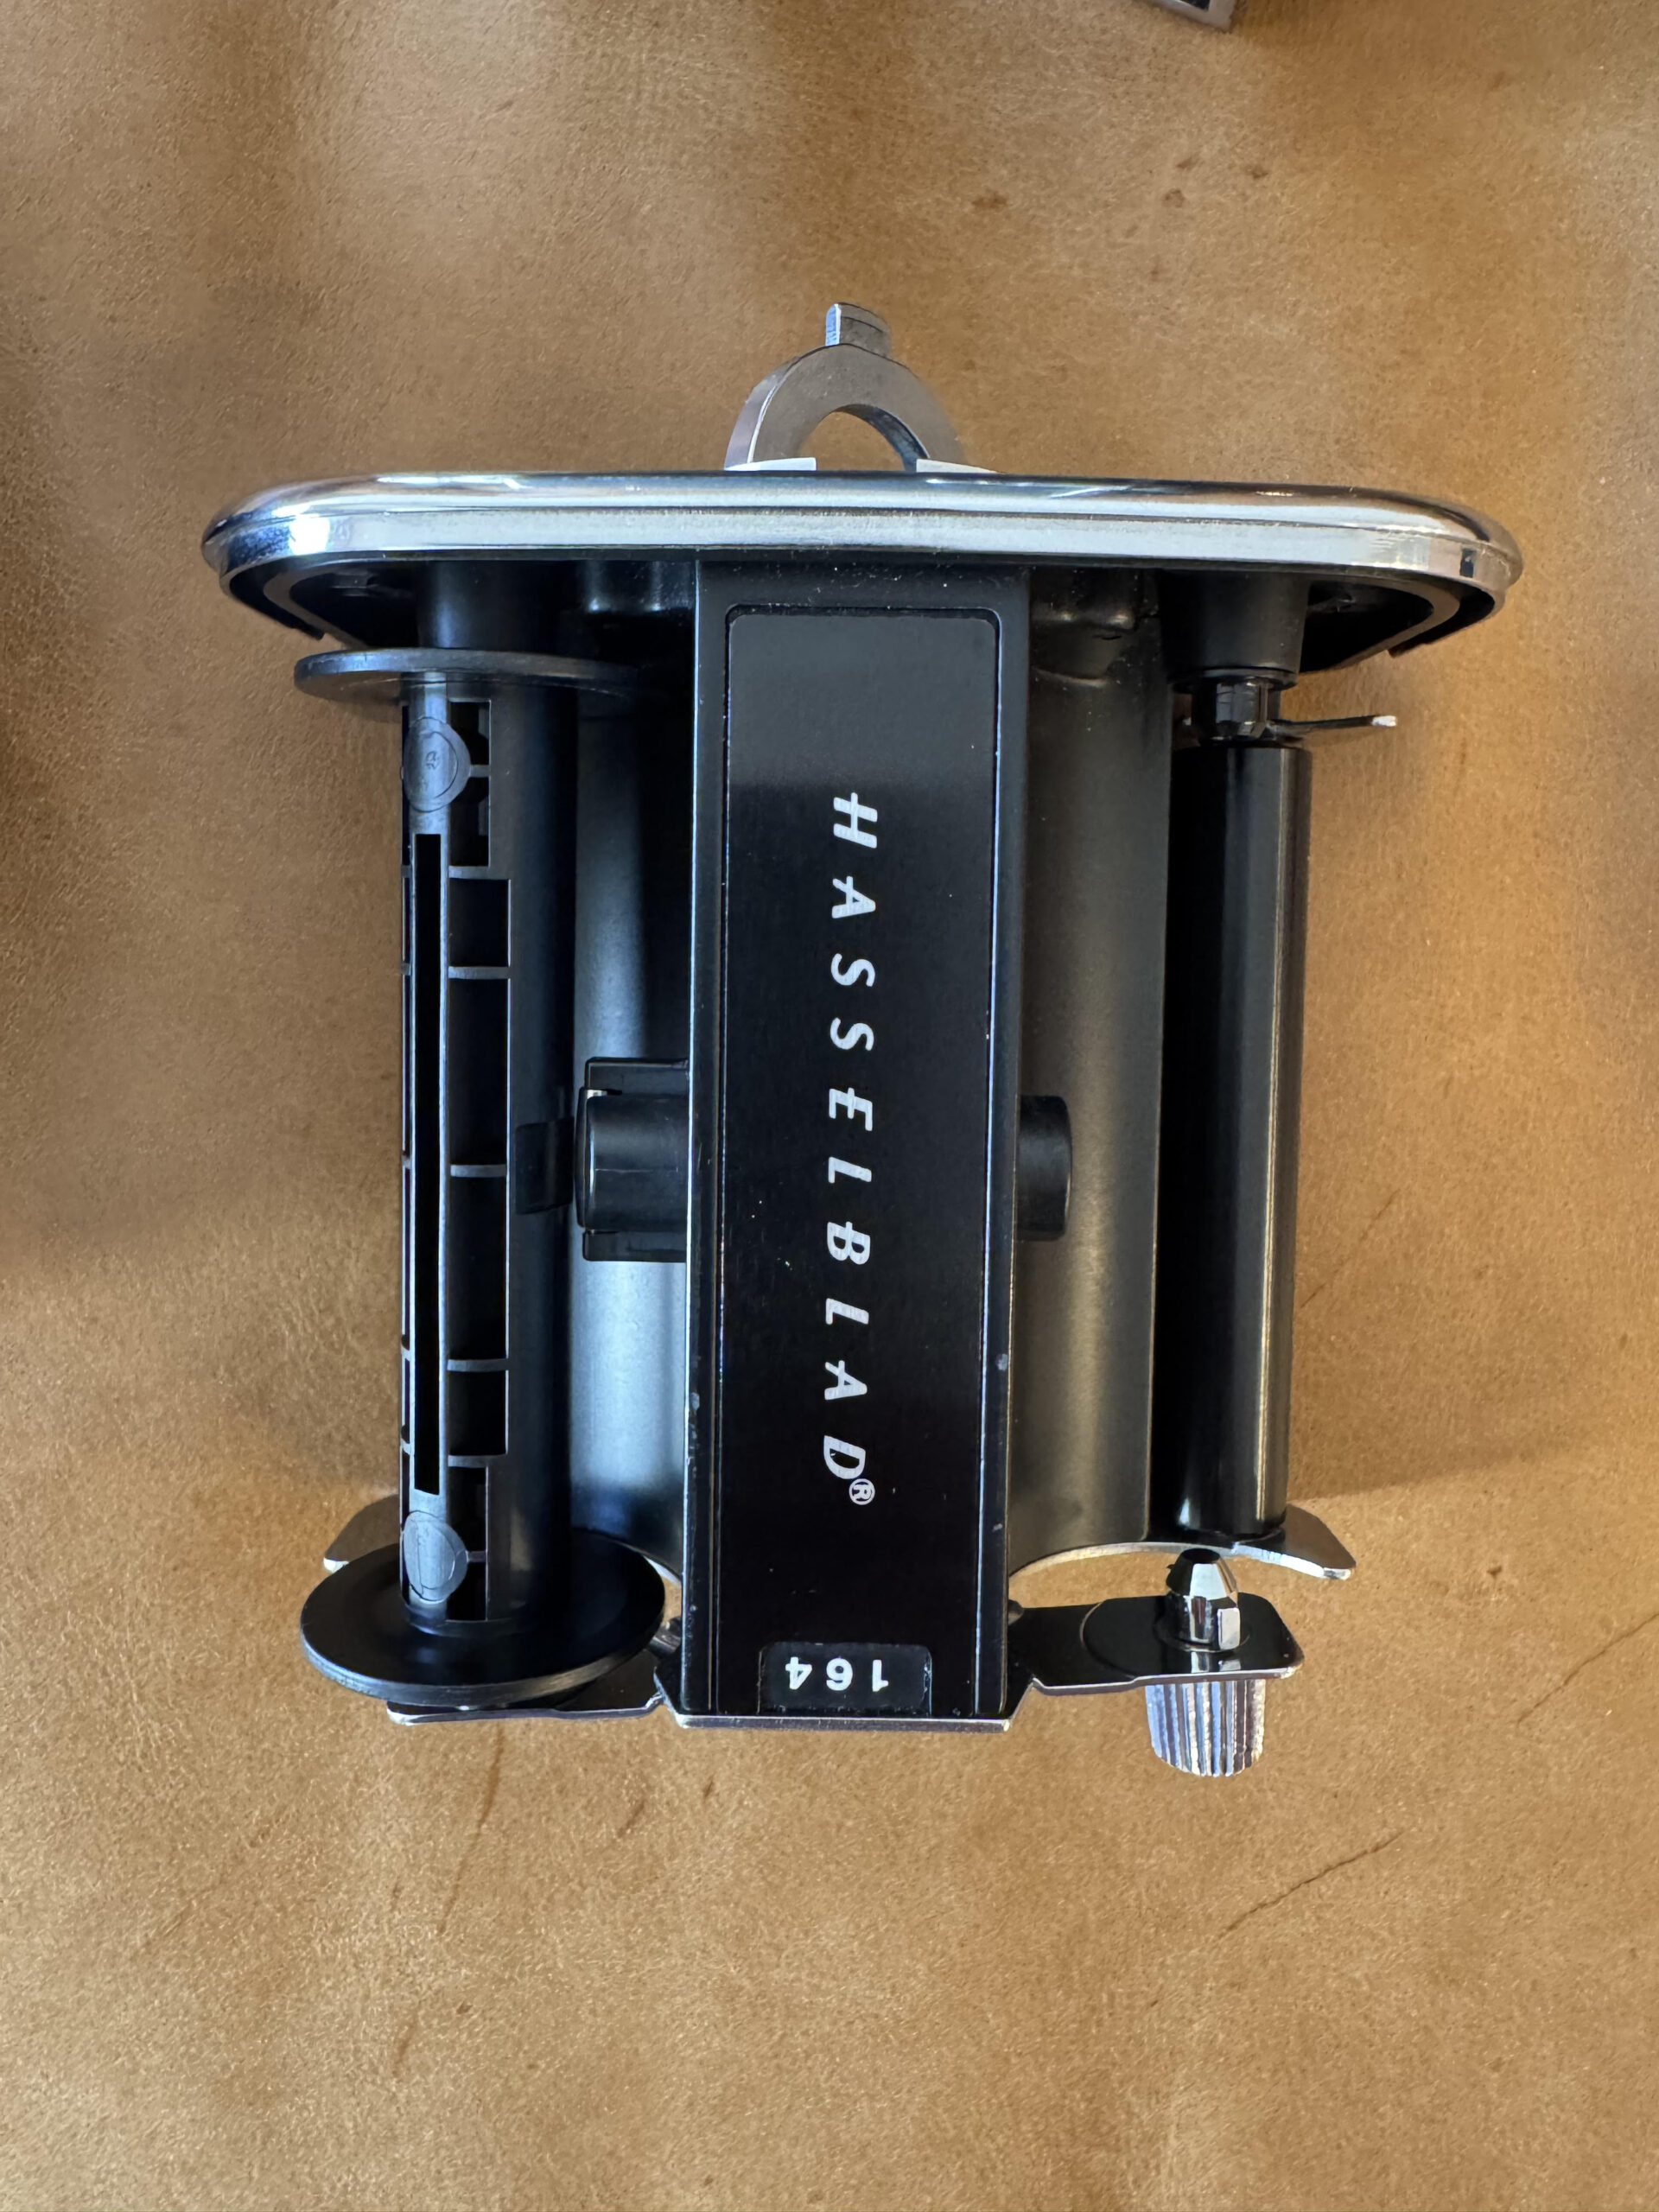
Step 3: Move the empty spool. Take the empty spool from the take-up side and place it on the supply side (the side with the film indicator window).
Step 4: Load the fresh roll. Place your fresh 120 roll on the now-empty take-up side. The film should unwind toward you, with the paper backing facing the lens. I’ve loaded film backwards and spent an entire day never recording an image, though I thought I was. This step is crucial. The film is on the inside of the role.
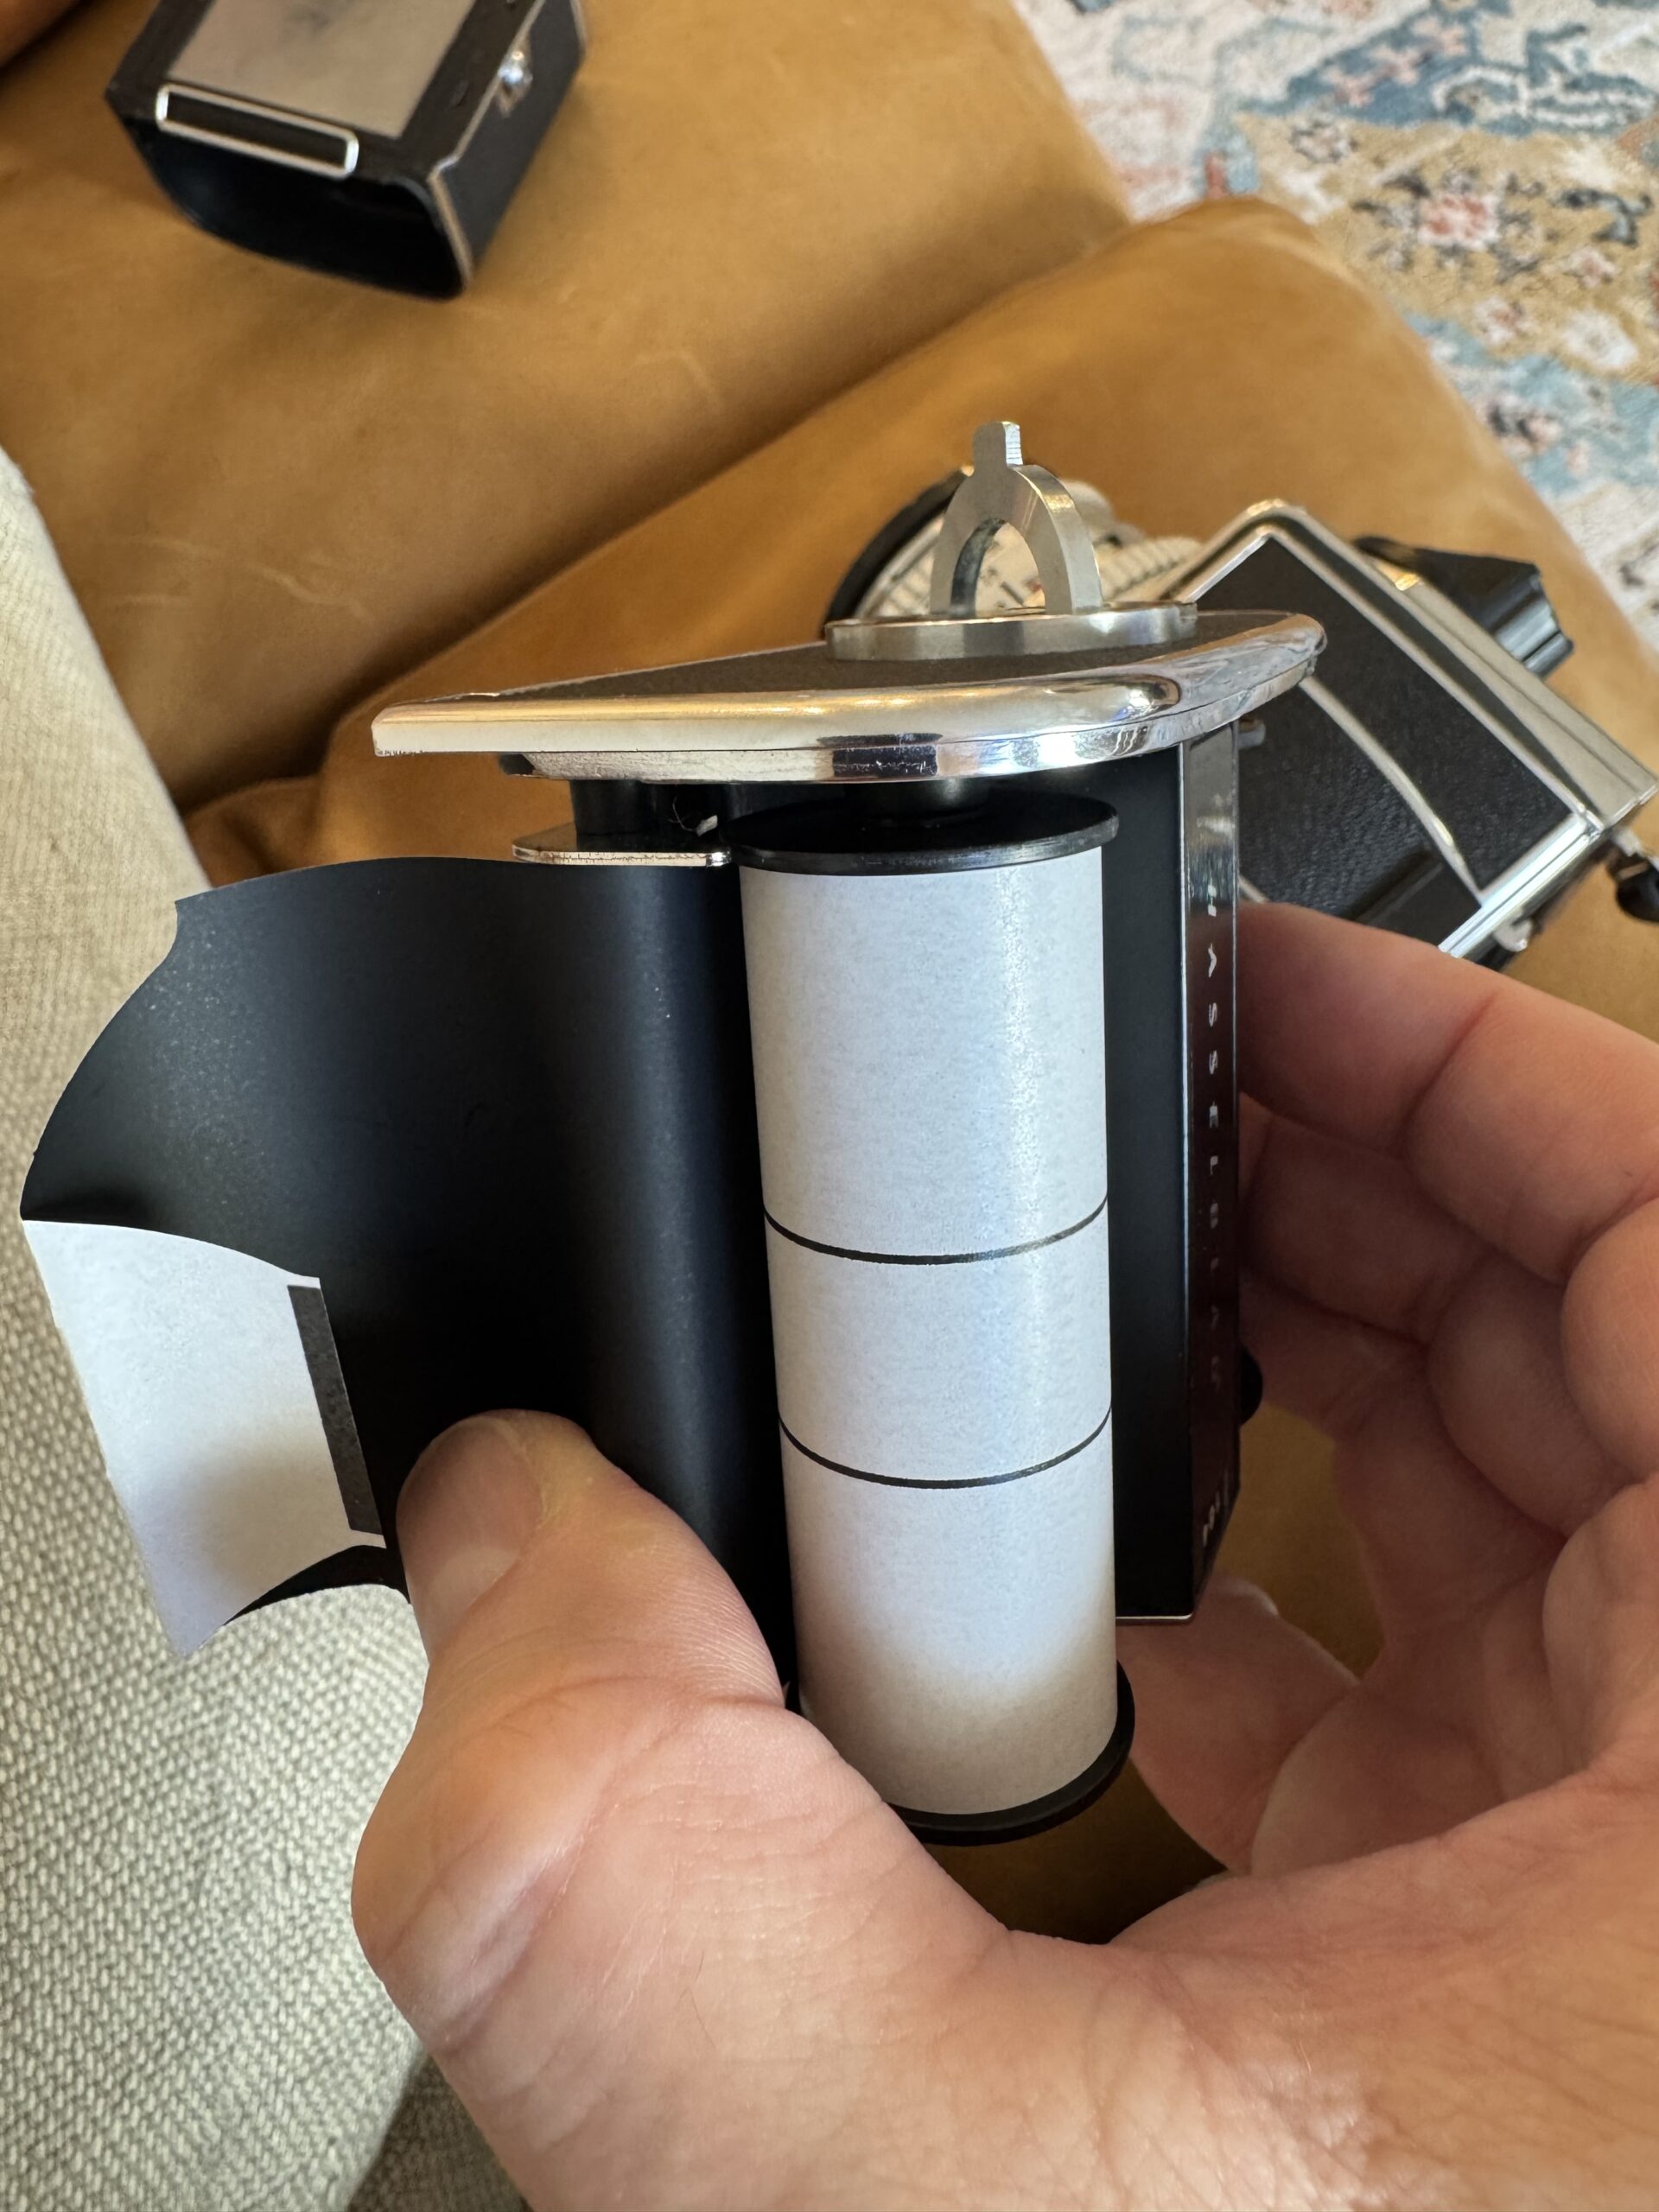
Step 5: Thread the film. Pull the paper leader across the film plane and thread it into the slot on the empty spool (now on the supply side). The paper should wrap around the spool in the direction of the arrow.
Step 6: Wind to the start mark. Turn the winding key on the insert while keeping slight tension on the supply roll. Wind until the start arrow on the paper backing aligns with the red index mark on the insert.
Step 7: Reinsert the magazine. Slide the loaded insert back into the magazine shell until it clicks. The frame counter should show “1” after you cock the camera.
Step 8: Set the film reminder. Rotate the indicator on the magazine to show what film type you’ve loaded—invaluable when shooting with multiple backs.
Attaching the film Magazine to the Body
Slide the magazine onto the body from the back until both catches click into place. The magazine will only attach if the body is cocked and the magazine’s dark slide is inserted. Once attached, remove the dark slide and store it in the holder on the side of the magazine—you’ll need it before removing the magazine again.
Setting Exposure
The Hasselblad 500 series cameras have no built-in light meter, so you’ll need a handheld meter or use the sunny 16 rule.
Setting shutter speed: Rotate the shutter speed ring on the lens. Speeds typically range from 1 second to 1/500th. The “B” setting keeps the shutter open as long as the release is pressed.
Setting aperture: Rotate the aperture ring. Hasselblad Zeiss lenses typically range from f/2.8 to f/22 depending on the lens.
The EV scale: The lens features an EV (exposure value) scale that locks shutter speed and aperture together. Once set to your metered EV, you can shift between equivalent exposures without changing overall exposure. To use it, press the small lock button between the rings while adjusting either ring.
Focusing and Composing
Using the waist-level finder: Open the hood by pressing the button on the back and lifting. The image appears reversed left-to-right on the ground glass. Pull up the built-in magnifier for critical focus—flip it up from its storage position inside the hood. To close, press inward on both sides of the hood simultaneously.
Using a prism finder: Prism finders provide an eye-level, correctly oriented image. Simply look through the eyepiece as you would with a 35mm SLR.
Focusing: Rotate the focus ring while watching the ground glass. The split-image center or microprism collar (depending on your screen) aids precise focus. For the sharpest results, focus with the lens wide open, then stop down to your shooting aperture.
Taking the Photo
Step 1: Ensure the camera is cocked (the crank should be folded flat against the body).
Step 2: Confirm the dark slide is removed. The shutter release is mechanically blocked when the slide is inserted.
Step 3: Compose and focus.
Step 4: Press the shutter release smoothly. You’ll hear the mirror flip up followed by the leaf shutter firing.
Step 5: Advance to the next frame by unfolding and rotating the cocking crank one full turn clockwise. This advances the film, cocks the lens shutter, and resets the mirror.
Using the Self-Timer
The self-timer is built into the lens, not the body.
Step 1: Ensure the camera and lens are fully cocked.
Step 2: Locate the self-timer lever on the lens barrel (usually marked with a “V” for Vorlaufwerk).
Step 3: Push the lever in the direction of the arrow to engage. On most lenses, this is a sliding lever that clicks into position.
Step 4: Press the shutter release. The timer provides approximately 8–10 seconds of delay before firing.
Note: The self-timer can also reduce vibration for critical sharpness when combined with the mirror lock-up function, even without the delay—some photographers use it simply to provide a gentler shutter release.
Using Mirror Lock-Up
For maximum sharpness, especially at slower shutter speeds or with longer lenses, use the mirror lock-up (MLU) to eliminate mirror slap vibration.
Step 1: Compose and focus your image.
Step 2: Push the MLU lever on the side of the body. The mirror will flip up and stay up, and your viewfinder will go black.
Step 3: Press the shutter release to fire the shutter.
Step 4: Cock the camera to reset the mirror.
For long exposures on a tripod, combine MLU with a cable release for the sharpest possible results.
Changing Lenses
Step 1: Ensure the lens and body are both cocked. The lens cannot be removed if the shutter is uncocked.
Step 2: Press the lens release button on the front of the body.
Step 3: Rotate the lens counterclockwise about 30 degrees until it stops.
Step 4: Pull the lens straight out.
Step 5: To mount a new lens, align the red index marks on lens and body, insert the lens, and rotate clockwise until it clicks.
Important: Never force a lens on or off. If it won’t turn, check that both lens and body are cocked.
Unloading Film
Step 1: After your 12th frame, continue winding until you feel no resistance and the crank turns freely. This winds the paper trailer fully around the exposed roll.
Step 2: Insert the dark slide into the magazine.
Step 3: Remove the magazine from the body.
Step 4: Remove the insert from the magazine.
Step 5: Remove the exposed roll from the supply side. Seal it with the paper sticker attached to the end of the roll.
Tips for Better Results
Brace yourself. The Hasselblad is a heavy system. At slower shutter speeds, brace your elbows against your body and exhale slowly as you release.
Don’t forget the dark slide. Before removing the magazine, always insert the dark slide. Before shooting, always remove it. Many photographers have lost shots to the dreaded blocked shutter.
Check your cocking. The camera, lens, and magazine must all be in sync. If anything seems stuck, gently work through the cocking sequence without forcing.
Pre-visualize your square. The 6×6 format is uniquely challenging. Learn to compose within the square rather than planning to crop later.
Embrace the pace. With only 12 frames per roll and a deliberate operating procedure, the Hasselblad encourages thoughtful photography. This is a feature, not a limitation.
Maintenance and Care
Store your Hasselblad with the shutter uncocked to reduce spring tension over time. Keep the lens caps on and the magazine dark slide inserted. Periodically exercise the shutter at all speeds to keep the lubricants distributed. Have the camera serviced every few years or if shutter speeds become inaccurate—these mechanical systems need professional CLA (clean, lubricate, adjust) service to maintain precision.
The Hasselblad 500 series rewards photographers who embrace its deliberate workflow. Each frame becomes an act of intention. There’s a reason these cameras remain in active use nearly seven decades after their introduction—they produce extraordinary images and transform the act of photography into something truly special.
Purchasing gear from the above link helps me keep the site going!